How to Train for Climbing [Full Body Guide ft. Dan Beall] (2023)
Hooper’s Beta Ep. 125
Introduction
We get a ton of comments asking us what the best exercises are for climbers. And I totally get it; it’s hard to figure out when the options seem endless and confusing. But here’s the issue: there is no one-size-fits-all approach. Everyone has different training requirements and goals due to age, athletic background, injuries, genetics, diet, training time, etc. So it becomes impossible to just say “these are ‘the best’ exercises for climbing and this is how you should implement them.” However, what we can do is give you a better understanding of the underlying mechanics of climbing, which you can use to help inform your training decisions, as well as some recommendations to get you started. So in this video we’re going to provide a guide to learning the muscles and structures that climbers use most, breaking it down by movement types so you can see the anatomy behind the moves we encounter on the wall. Plus, we’ll have pro climber and coach Dan Beall on hand to provide exercise recommendations for beginners and experienced climbers alike. By the end you’ll be able to make more informed decisions about training, rehab, and even injury prevention, so let’s get into it!
Quick Note
By the way, just a quick note: this is going to be a longer video with a lot of information, so don’t feel like you need to memorize it all on the first pass. Instead, use it to get a general perspective on anatomy and training, and then come back to specific sections when you need a particular recommendation or refresher. We’ve added timestamps to help make navigation easier.
Upper Body
Vertical Pulling


Let’s start with the most ubiquitous movement in climbing: vertical pulling. There are many variations of pullup-like movement in climbing, all of which will be slightly different in terms of biomechanics, but we can easily learn the most relevant aspects. Lats will be the primary movers of the arms, pulling the arm down (adduction) and back (extension). Meanwhile, the rhomboids and traps will be crucial in rotating and retracting the shoulder blades throughout the entire motion, which is necessary for healthy biomechanics of the shoulder. On top of that, the biceps and brachialis muscles will be critical in flexing the elbows. These are some of the main muscles that help move you up the wall, or in other words, move your arms from an elevated position to a lowered one. But, you may be surprised to learn that the pecs and deltoid muscles also assist depending on the position of the arm. As you can see, pulling up involves a coordinated effort between a lot of different muscles, though some will be taxed far more heavily than others. In fact, we even have a full length video on the biomechanics of pullups that you can check out if you really want to learn the nitty gritty differences between them. But for everyone else, let’s hear what Dan has to say.
Horizontal Pulling


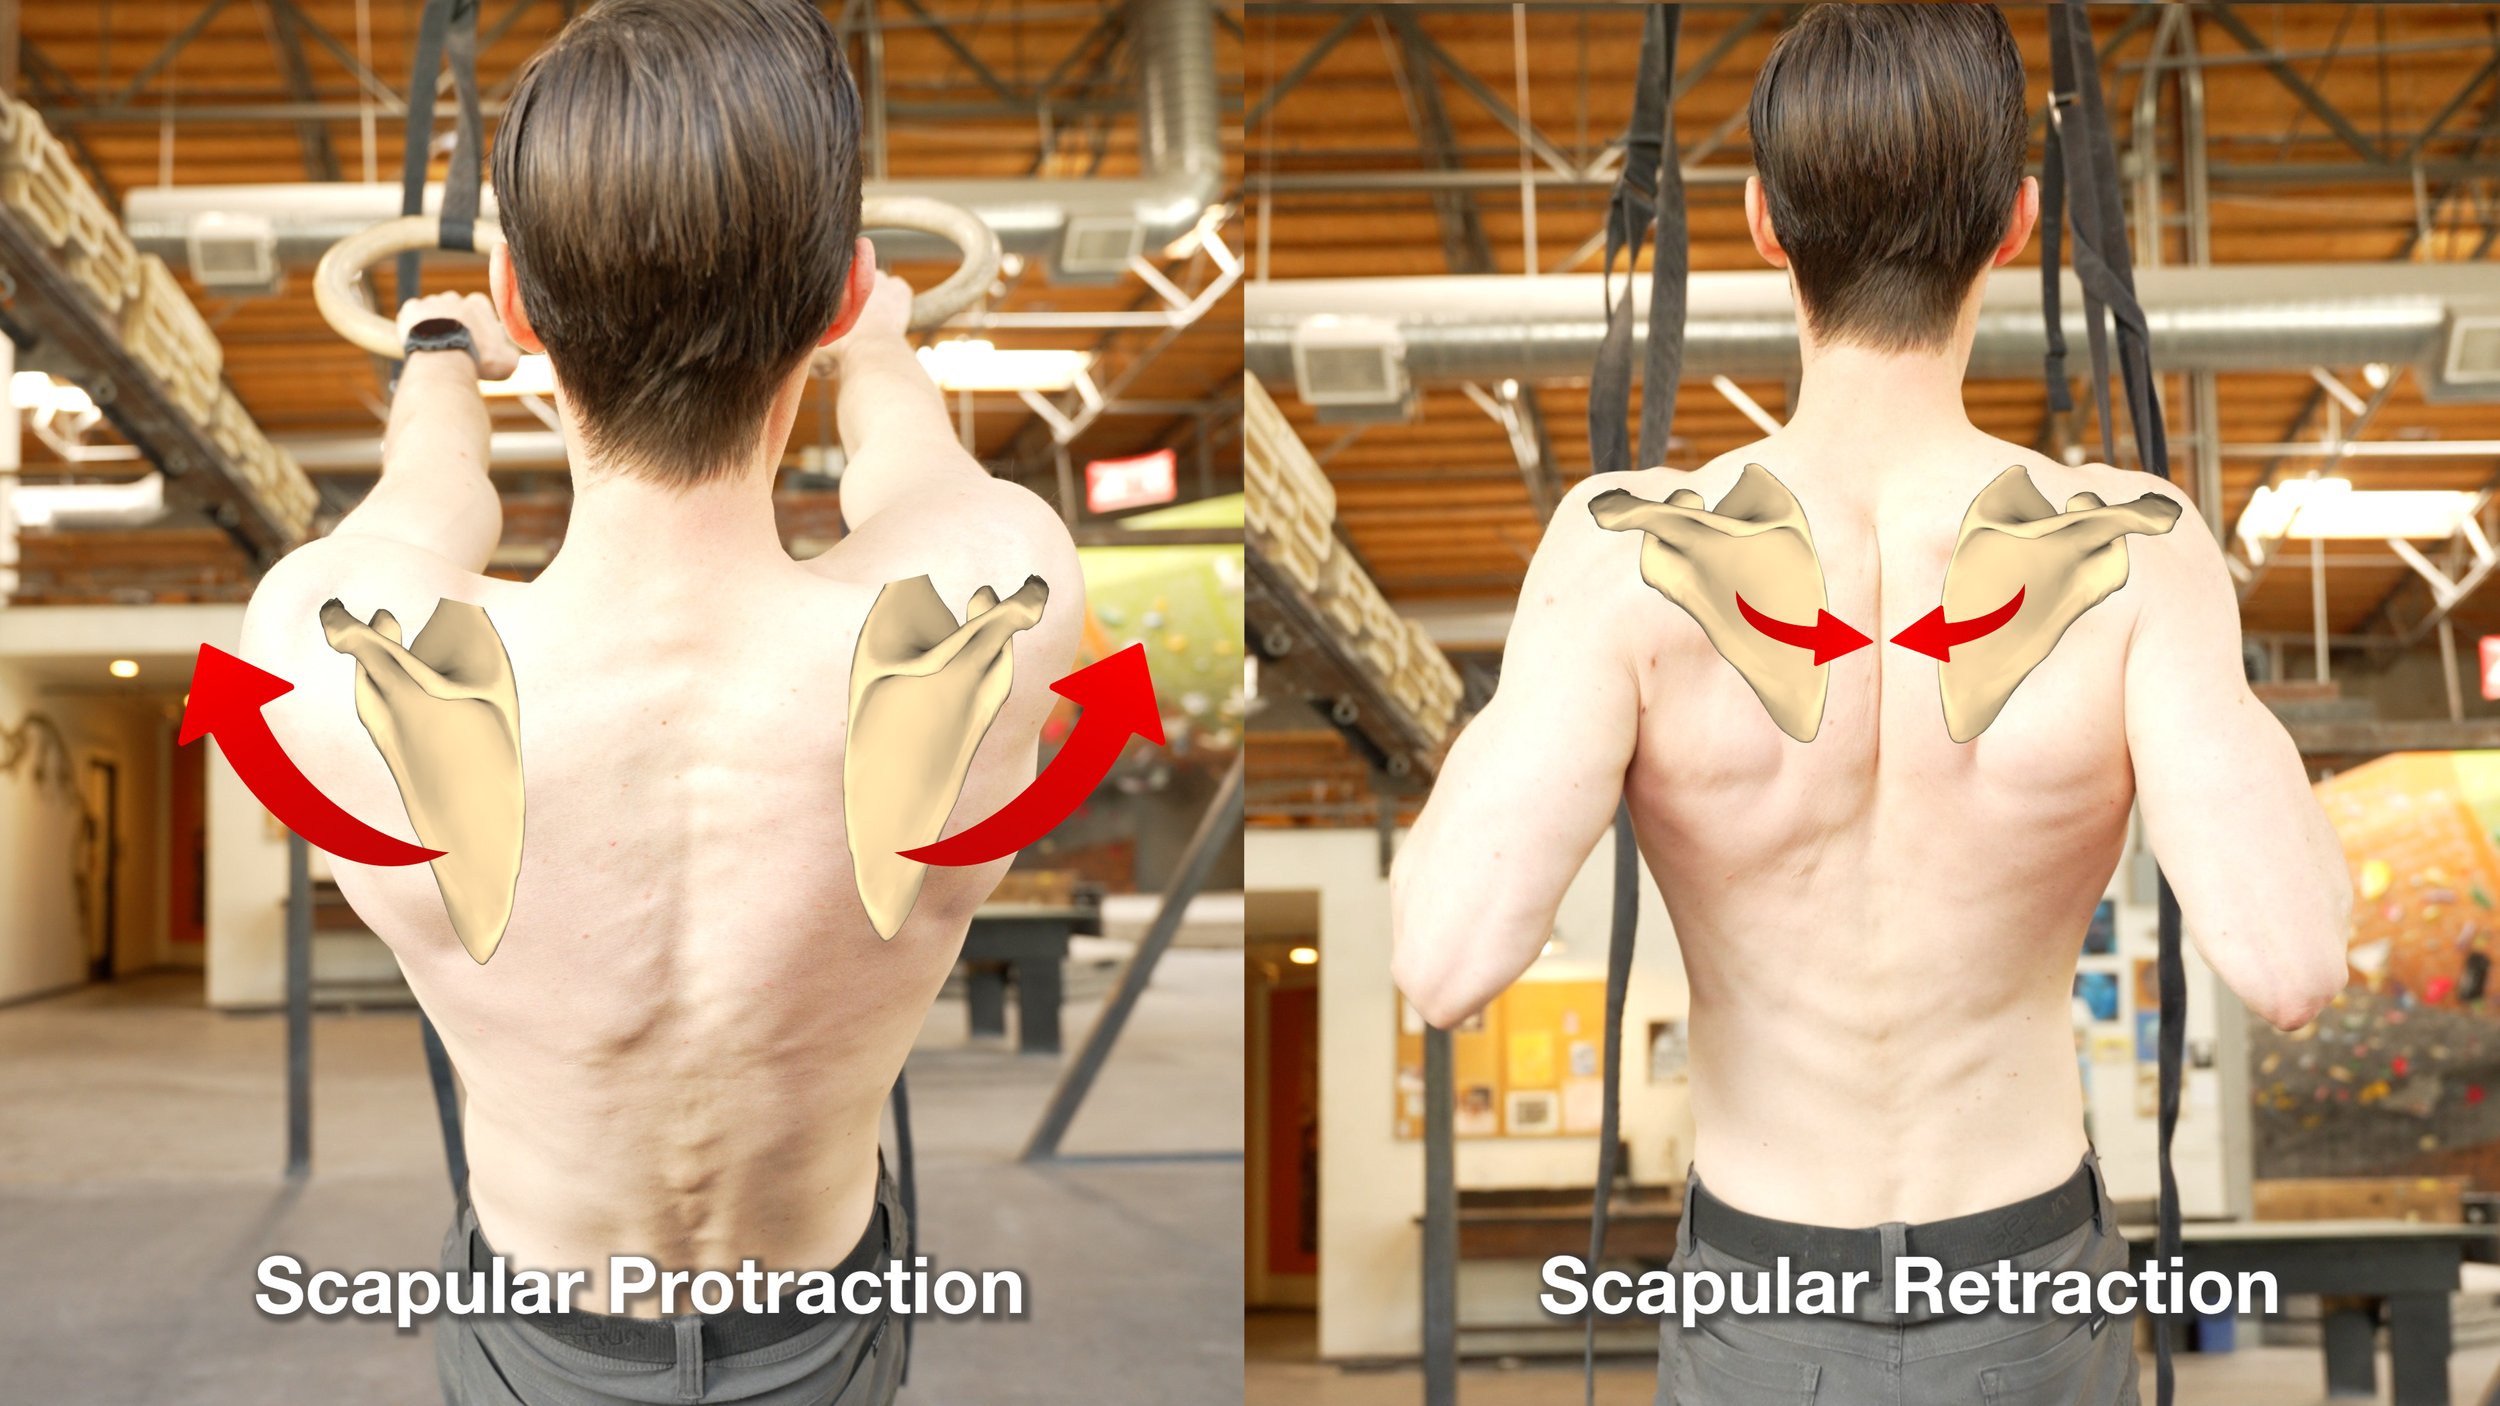
Horizontal pulling, which tends to look like pulling into the wall, is a critical move in climbing and something that often gets overshadowed by pullups. While the pullup moves the arm from an elevated position to a lowered one, horizontal pulling moves the arm from a flexed to an extended one, and the scapula from a protracted to a retracted position. This means that the anatomy under significant stress are the retracting and extending muscles, namely the rhomboids and the traps. Of course, the biceps will still be heavily involved to flex the elbow, and the lats will as well as you create shoulder extension, but the key difference from pullups here is the increased demand on the scapular retractors. If you find pull ups aren’t too bad, but you have difficulty with this type of rowing movement or even find that your biceps fail first, that may be due to a weakness or poor engagement of the scapular retractors.
Shoulder External Rotation
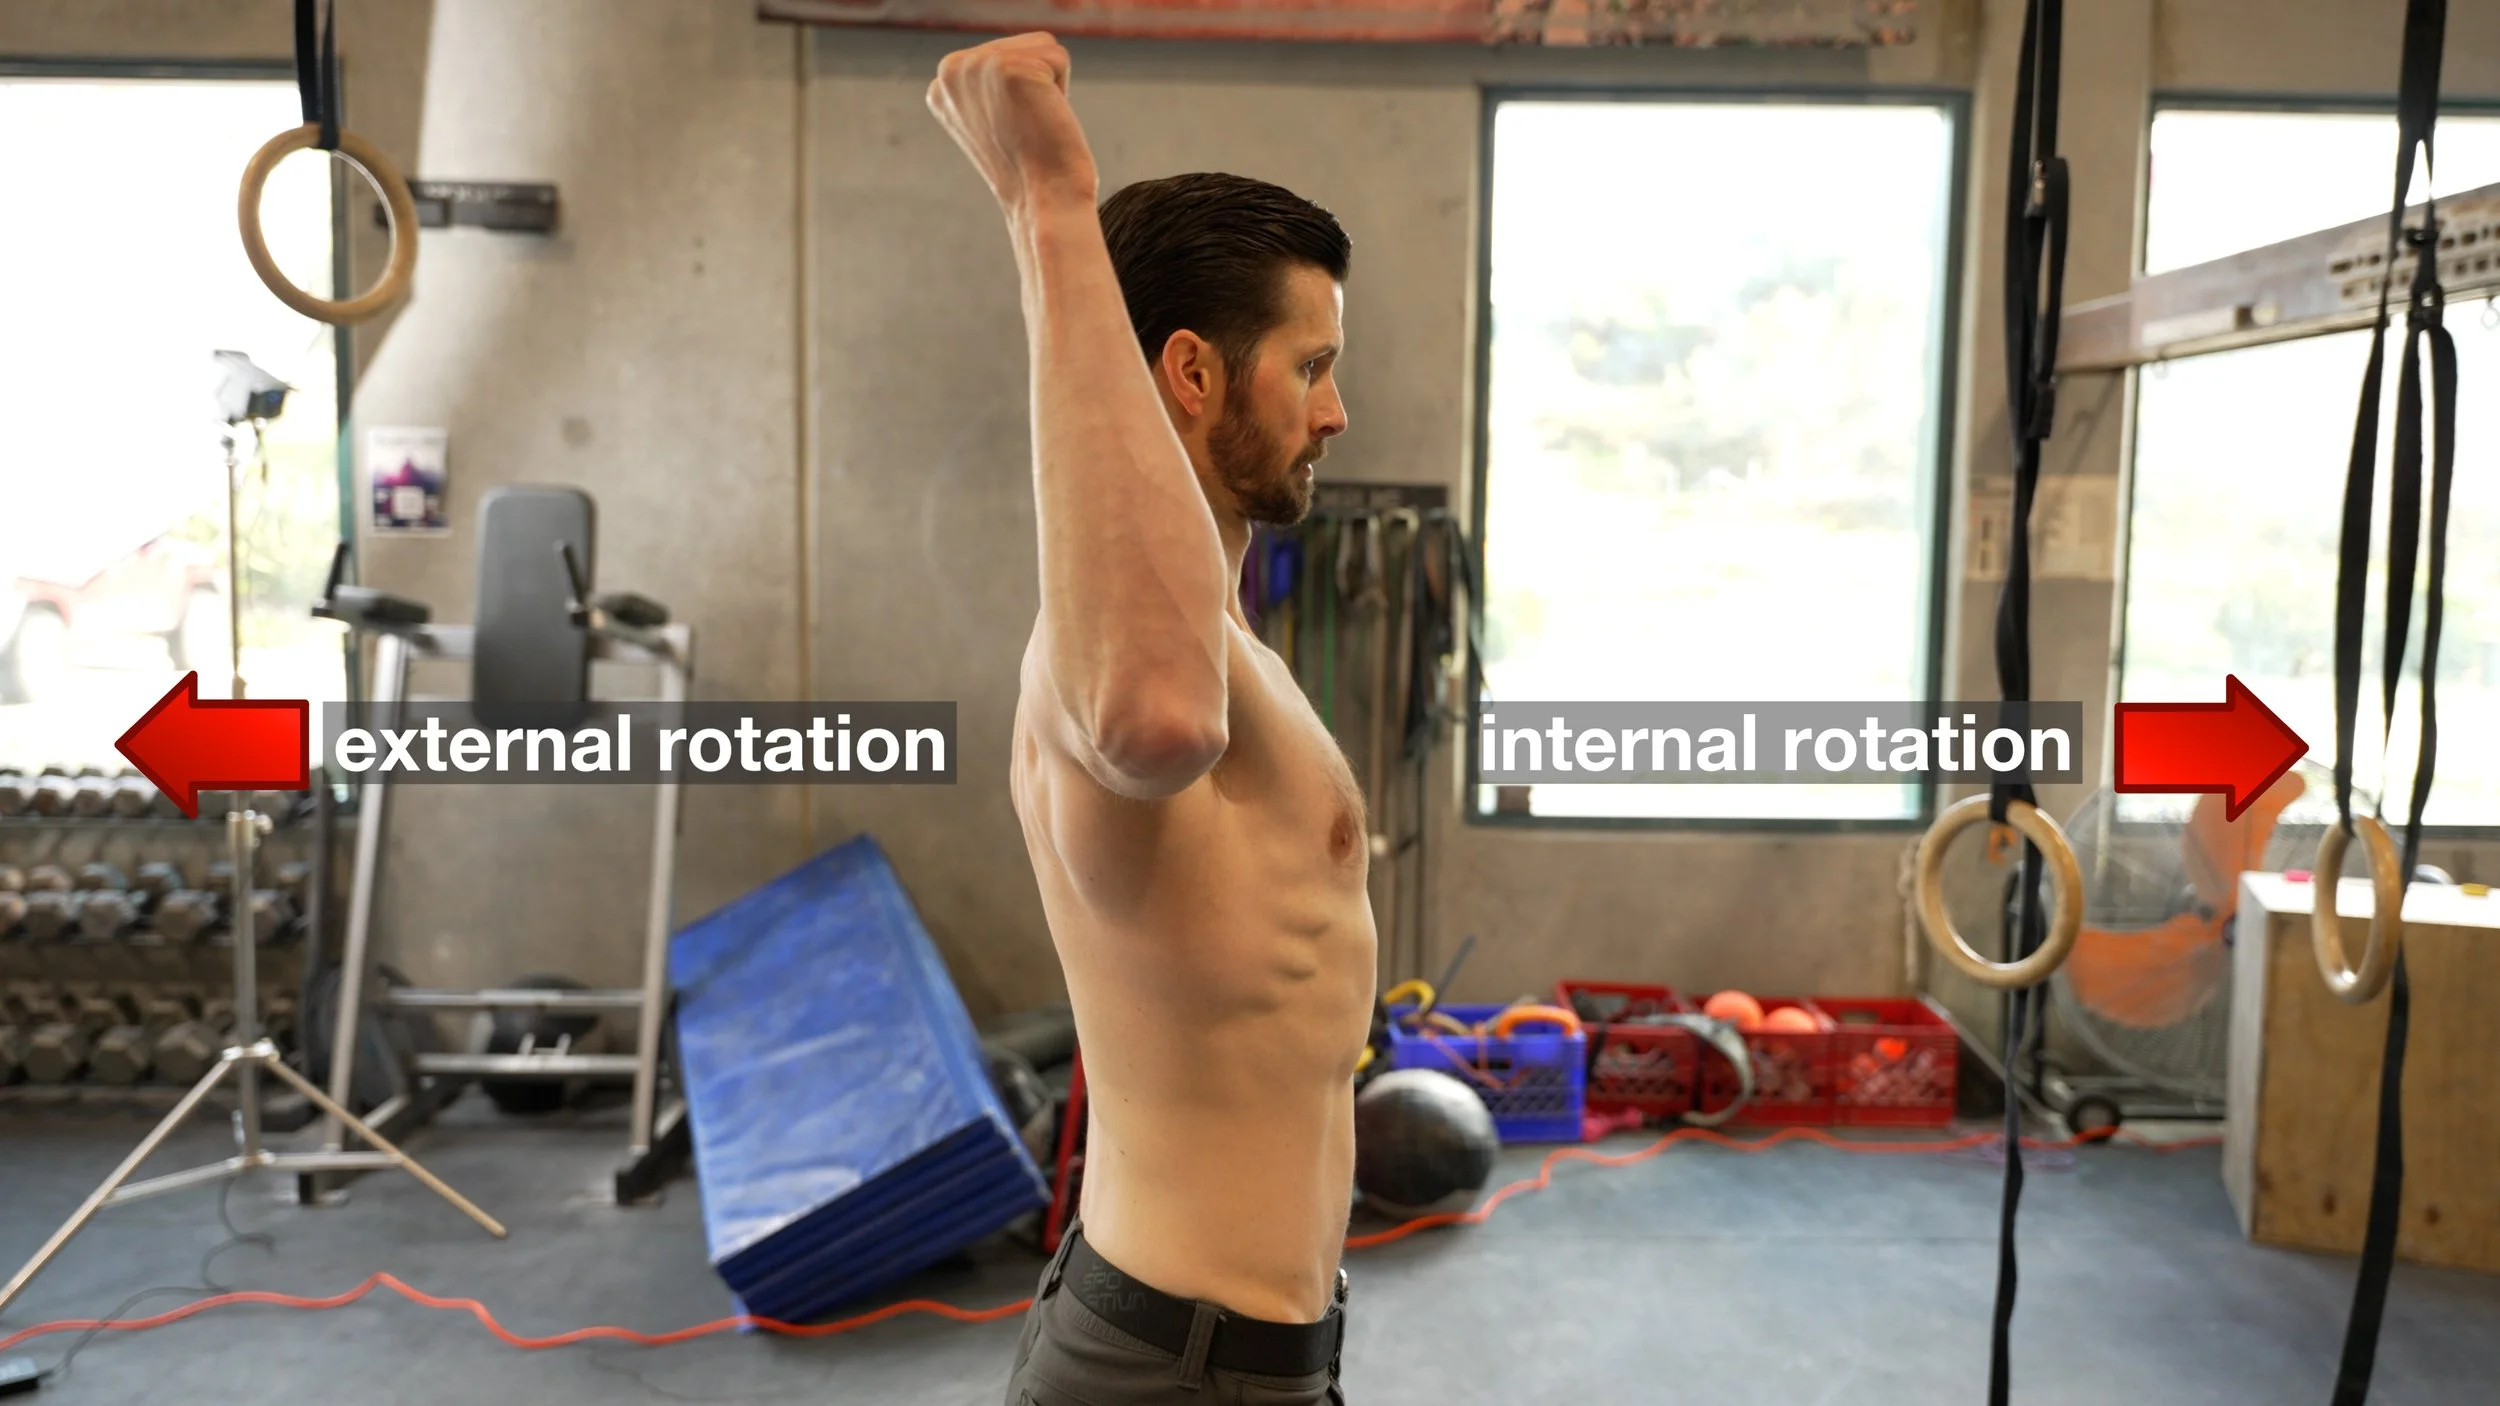


We often find ourselves pulling into the wall or doing moves in a way that requires a lot of external shoulder rotation strength. For example, take a “lock off” or just any time there’s a nice hold that’s at approximately head height. We now get a more significant shift in focus to the external rotators of the shoulder (infraspinatus and teres minor). These muscles, in conjunction with the rhomboids and traps, performing scapular retraction, help pull us in close to the wall, and stabilize the shoulder. The external rotators play a big role in keeping those shoulders safe and strong while doing those “shouldery” moves. Without proper strength in these muscles many climbers will develop shoulder pathologies or be more prone to acute shoulder injuries. Now, Dan is of course going to give his recommendations for shoulder external rotation strength, but if you know me you know I will never pass up an opportunity to mention face pulls. Face pulls are an excellent exercise to work on this motion as it strengthens the rotator cuff and trains that pulling IN motion. It’s important to note that the more overhead the shoulder is, the more demand on the lower trapezius to accomplish scapular retraction. When the shoulder is in the traditional “90-90” position, the middle trap will be more active. Adding that “overhead press” to the face pull exercise makes this the premier choice for rock climbers.
Compressing/Squeezing


Ever find yourself on a refrigerator block of stone, a killer dihedral, or two sweet opposing holds, squeezing for dear life? If so, you’ve definitely discovered the important role that the pectoral muscles play in climbing. The pec major muscle is primarily an adductor and internal rotator of the shoulder. But it isn’t alone! The pec minor helps move the scapula to support that motion, and the little known coracobrachialis is also involved as it helps adduct and flex the shoulder! Of course, we’d be mistaken not to also mention the subscapularis muscle, which is part of the rotator cuff. Its role is to help internally rotate the shoulder and stabilize the humerus. This will also be more active while performing compression moves. If you find compression moves to be difficult, it could very easily be a limit of the aforementioned muscles, but it could also be an overall weakness in the rotator cuff. Why? Because a weak rotator cuff can actually cause our brains to limit the amount of force we can generate with other opposing muscles. As we’ll learn later in this video, the brain typically doesn’t allow the body to generate a ton of force in one direction without stability in the opposing muscles. So if all those big strong “squeezing” muscles aren’t balanced by a strong rotator cuff, you may find those muscles don’t feel as strong as they should and/or you could be at a little higher risk of injuring the rotator cuff itself or the shoulder labrum during intense shoulder movements.
Pushing


In order to move up or across, you’re not always just going to be pulling; often you have to push as well. Examples of this include gastons, mantles, some lock-offs, and just big moves in general. Take mantling: the triceps and pecs become much more involved to straighten the elbow and stabilize the arm and shoulder blade. During big moves, or when at the end range of a pulling move, your arm actually can change from a pull into more of a push motion. This could be considered a somewhat advanced technique, though it can sometimes happen intuitively. Our triceps will also be activated to a much higher extent when pushing laterally. This is true whether pressing in a corner, or moving laterally from a gaston position. This is where it gets a bit tricky, though, as muscle activation patterns will change depending on where the hold is relative to your body. If the hold is directly in front of your face, your triceps will still be active, but your shoulder will also be stabilized by the external rotators and deltoids. When the move is more towards your side, the triceps are still active but the deltoids may take on even more force, making these feel like very “shouldery” moves. Without good strength in the deltoids and the rotator cuff (external rotators), “shouldery” moves may be something you find unusually hard or uncomfortable.
Lower Body
Pushing


The unknown hero to climbing, the flexor hallucis longus (FHL) muscle, is the main toe flexor of our big toe. Its anatomy and function is similar to the flexor digitorum profundus of our hand. The FHL starts on our tibia and runs all the way down to the distal phalanx of our big toe. It flexes the big toe, and in conjunction with the flexor digitorum muscles of the foot, are what allows us to pull into holds and push off of those tiny crystals. When you are on the point of your shoe, or the inside edge, the FHL is the most active. Of course, if we’re talking about pushing with our legs, let's not forget the calf muscles, the gastrocnemius and soleus, which allow you to stand further up on your feet while climbing. And also, the peroneals and posterior tibialis muscles, which are more active when performing edging. Without adequate strength in your feet, you may feel the effects during extended periods of time on small footholds as your feet will get tired more quickly or you simply won't trust them as much on smaller edges. Moving up the leg, we would of course get nowhere without the quads and glutes to help push us up the wall. The quads help extend the knee while the glutes help extend the upper thigh as we go from a more bent knee and flexed hip position to a straighter/extended position. If you find it extremely difficult to get out of a high foot position, you may benefit from some additional training there.
Pulling


The toe pull is very similar to the toe push, it will heavily involve the FHL muscle, the calf muscles, and other ankle stabilizers, but will also have a heavier activation of the hamstrings, glutes, and back muscles! Generally speaking, as the steepness of the climb increases, the more we’ll need to be pulling “in” with our legs, rather than just pushing. The muscles most used here are the posterior chain muscles, namely the calves, hamstrings, and glutes. While the strength of these muscles isn’t generally what will limit your climbing ability or cause you to fail on an overhanging route, maintaining good engagement and control of them while moving (aka having good coordination) is extremely useful. Also, coordination of certain core muscles like the obliques, glutes, and paraspinals will help you maintain control of your upper and lower body which will be important when trying to do a coordinated move with constant pressure on your toes. We’ll link our core strength vs body tension vid in the show notes if you’re interested. Another example of pulling in is when trying to get your hips closer to the wall. This isn’t just the arms, afterall. This is also the glute muscles, particularly the glute max, trying to get you from a more flexed position (hip away from the wall), to a more neutral or extended position (hips closer to the wall) which involves great activation of the glute max as well as flexibility in the adductors to allow you to open your hips.
Toe Hooking


The took hook is accomplished by the opposite muscle groups of the toe pull, so the toe extensors and the tibialis anterior muscle. This performs dorsiflexion of the ankle, which places it into a position more capable of hooking onto a hold. The rectus femoris of the thigh (which is one of the quad muscles), the hip flexors (iliacus and psoas muscles), and rectus abdominis of the core will also be more active in toe hooks as they help flex the hip and trunk which are useful for maintaining tension in the toe hook. Depending on your body position, internal or external rotation of the hip may also be required to maintain the position, which may mean activation of other various hip muscles such as the gluteus minimus, sartorius, and adductor muscles such as the adductor brevis will also contribute. If you have difficulty placing and maintaining toe hooks, the problem often comes down to a limitation in lower extremity flexibility or a strength deficit, or a combination of the two. For example, if you can’t get your leg up to the toe hook hold to begin with, there could be poor hip flexion or rectus femoris strength or tight hamstrings or glutes. On the other hand, if you can’t straighten your leg when you place your foot on the hold, flexibility of the hamstrings could be holding you back. Or if all of that seems fine and you still suck at toe hooks, it could be a weakness of the tibialis anterior muscles, or just a coordination or technique issue that requires more practice!
Heel Hooking


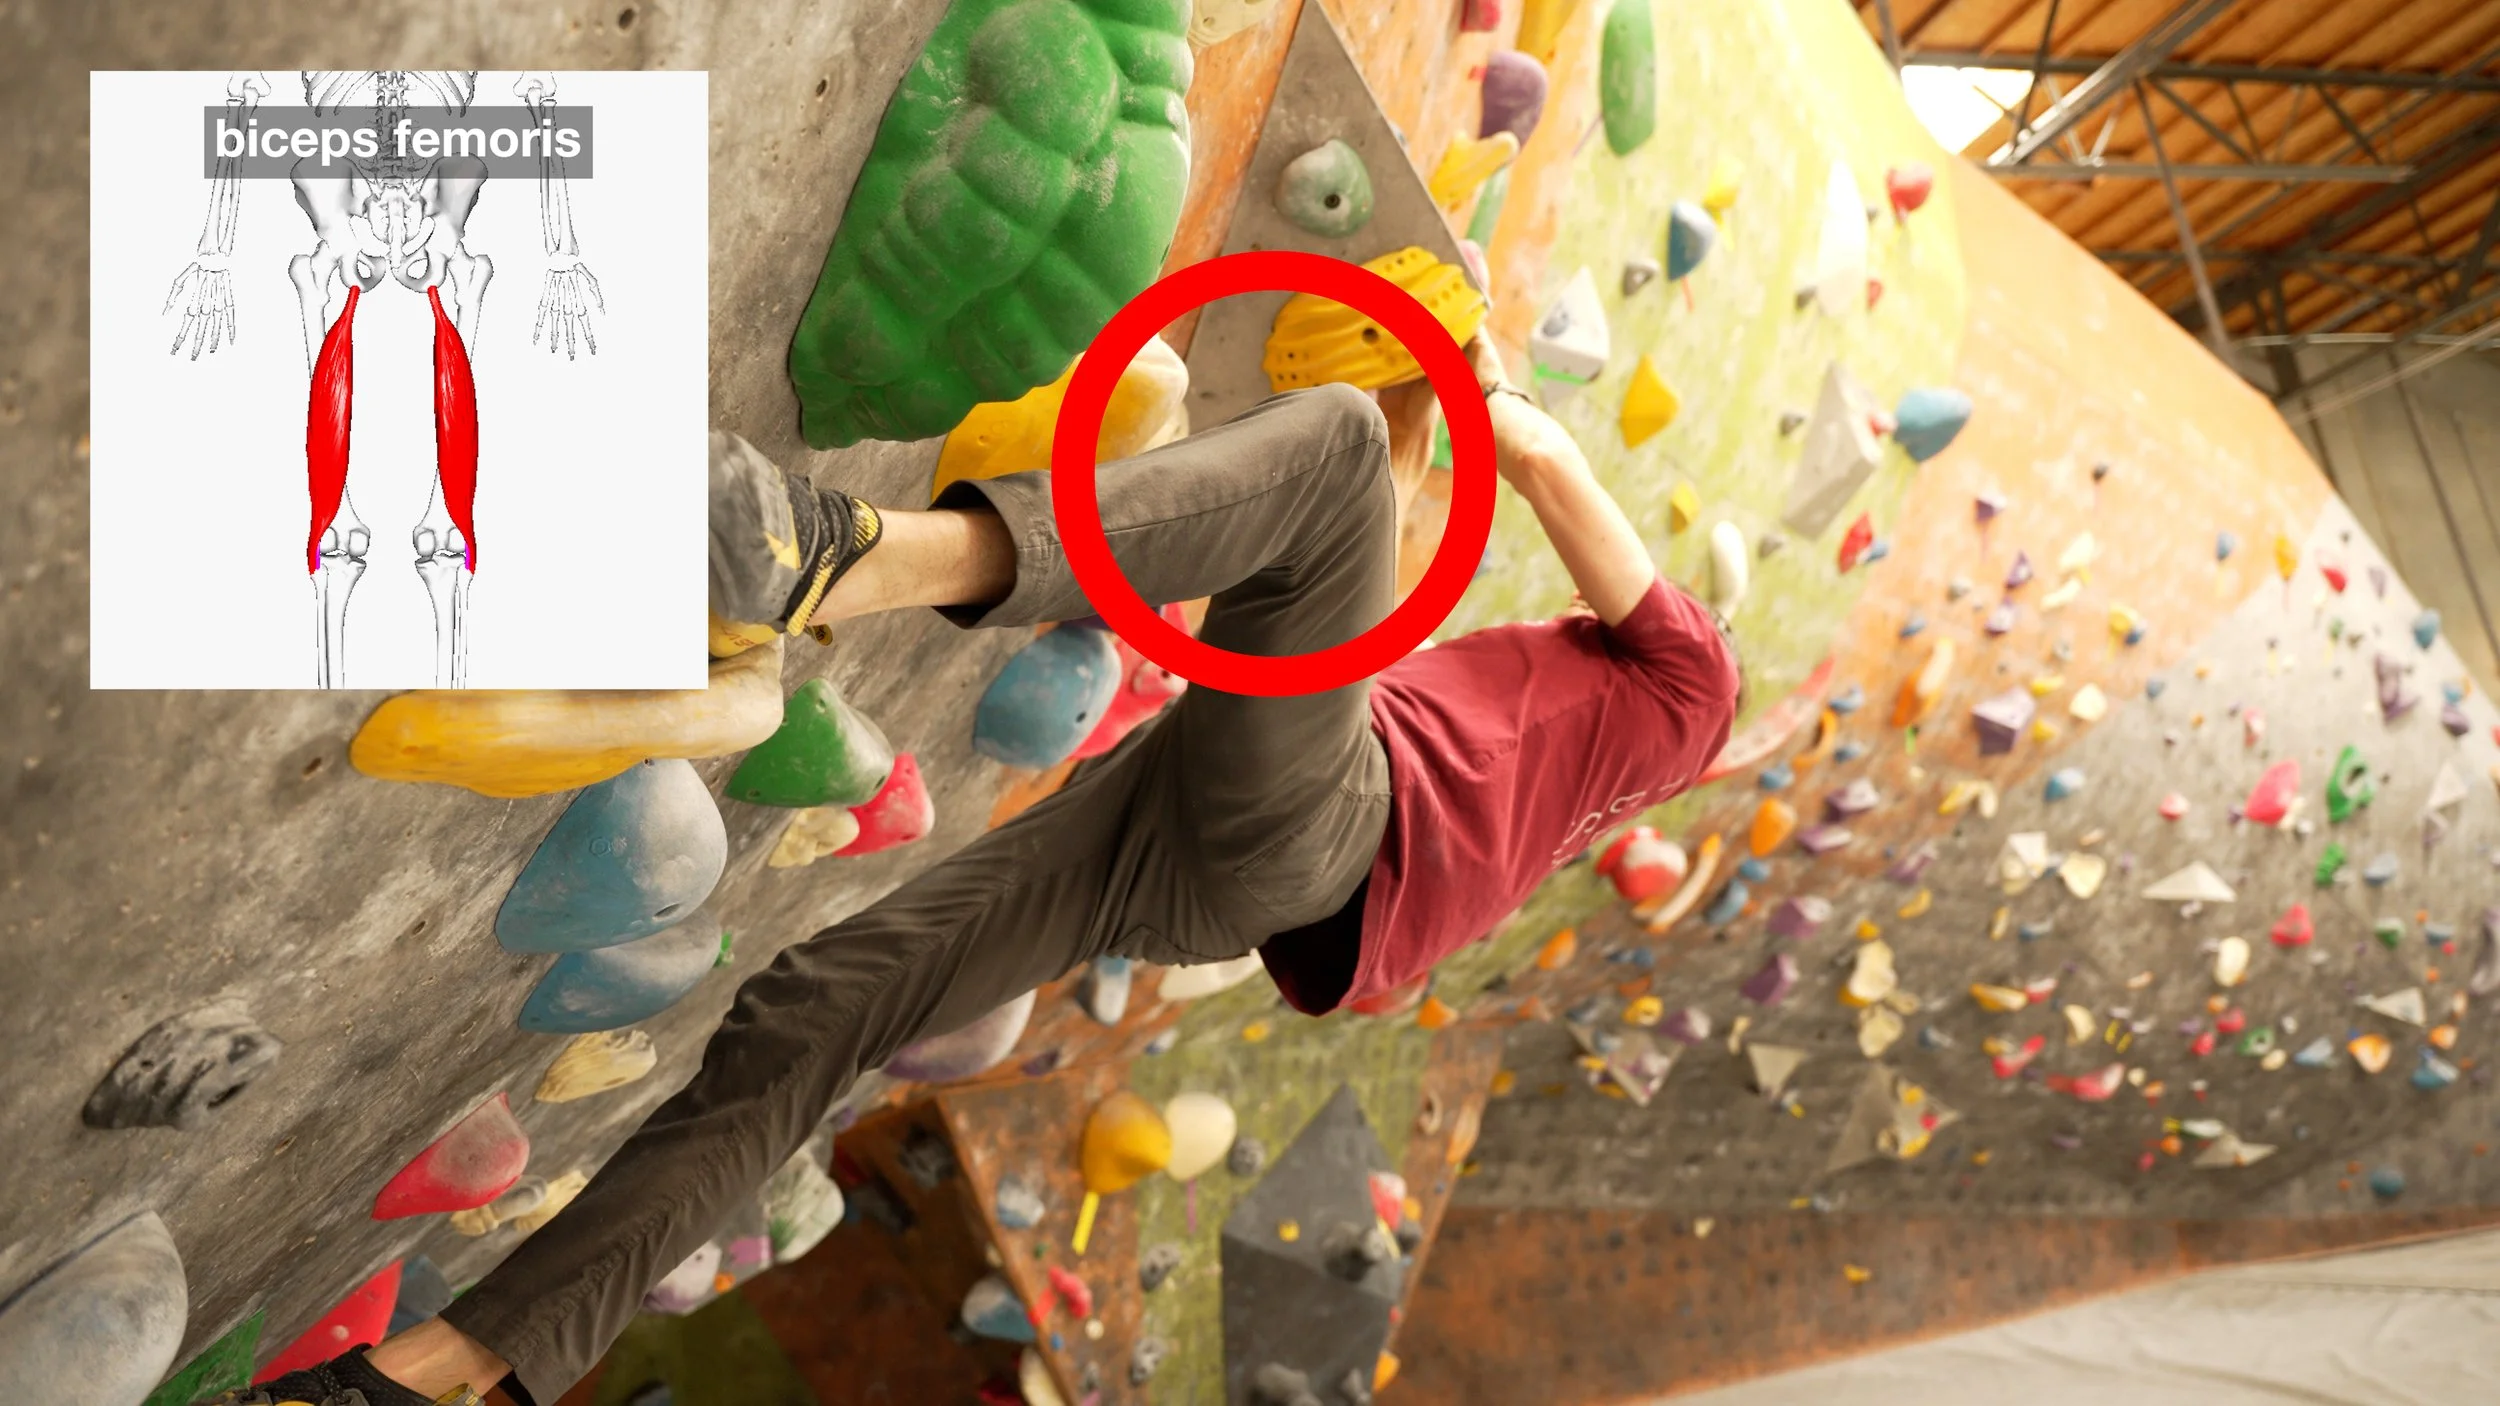


Heel hooks allow us to pull vertically as well as horizontally. For vertical pulling, the four primary muscles involved are the biceps femoris short and long head, semitendinosus, and semimembranosus. Each muscle has a slightly different role. The biceps femoris muscles flex the knee and extend the hip while performing slight external rotation of the knee, whereas the semi muscles perform the mostly same role except that they perform slight internal rotation of the knee. Since heel hooks are more often performed in an externally rotated position, the biceps femoris muscles are often what create most of the pulling force and are often the ones that get injured. If the leg is more externally rotated, the glute max will also be involved, which also increases tautness of the ITB and is why some people suffer ITB strains from a heel hook movement.
For horizontal pulling with a heel hook, you need even more external rotation of the leg, and will generate more force in the glute max as it tries to extend the leg which pulls your hips in closer to the wall. The biceps femoris will still be heavily taxed in this position, and this is where certain knee injuries can become more prevalent if you don’t have appropriate external rotation range of motion in the hip. The leg may attempt to make up for the lack of external rotation at the hip by simply externally rotating more through the knee joint, which will place additional stress on the ligaments and the meniscus.
Leg Adducting and Abducting
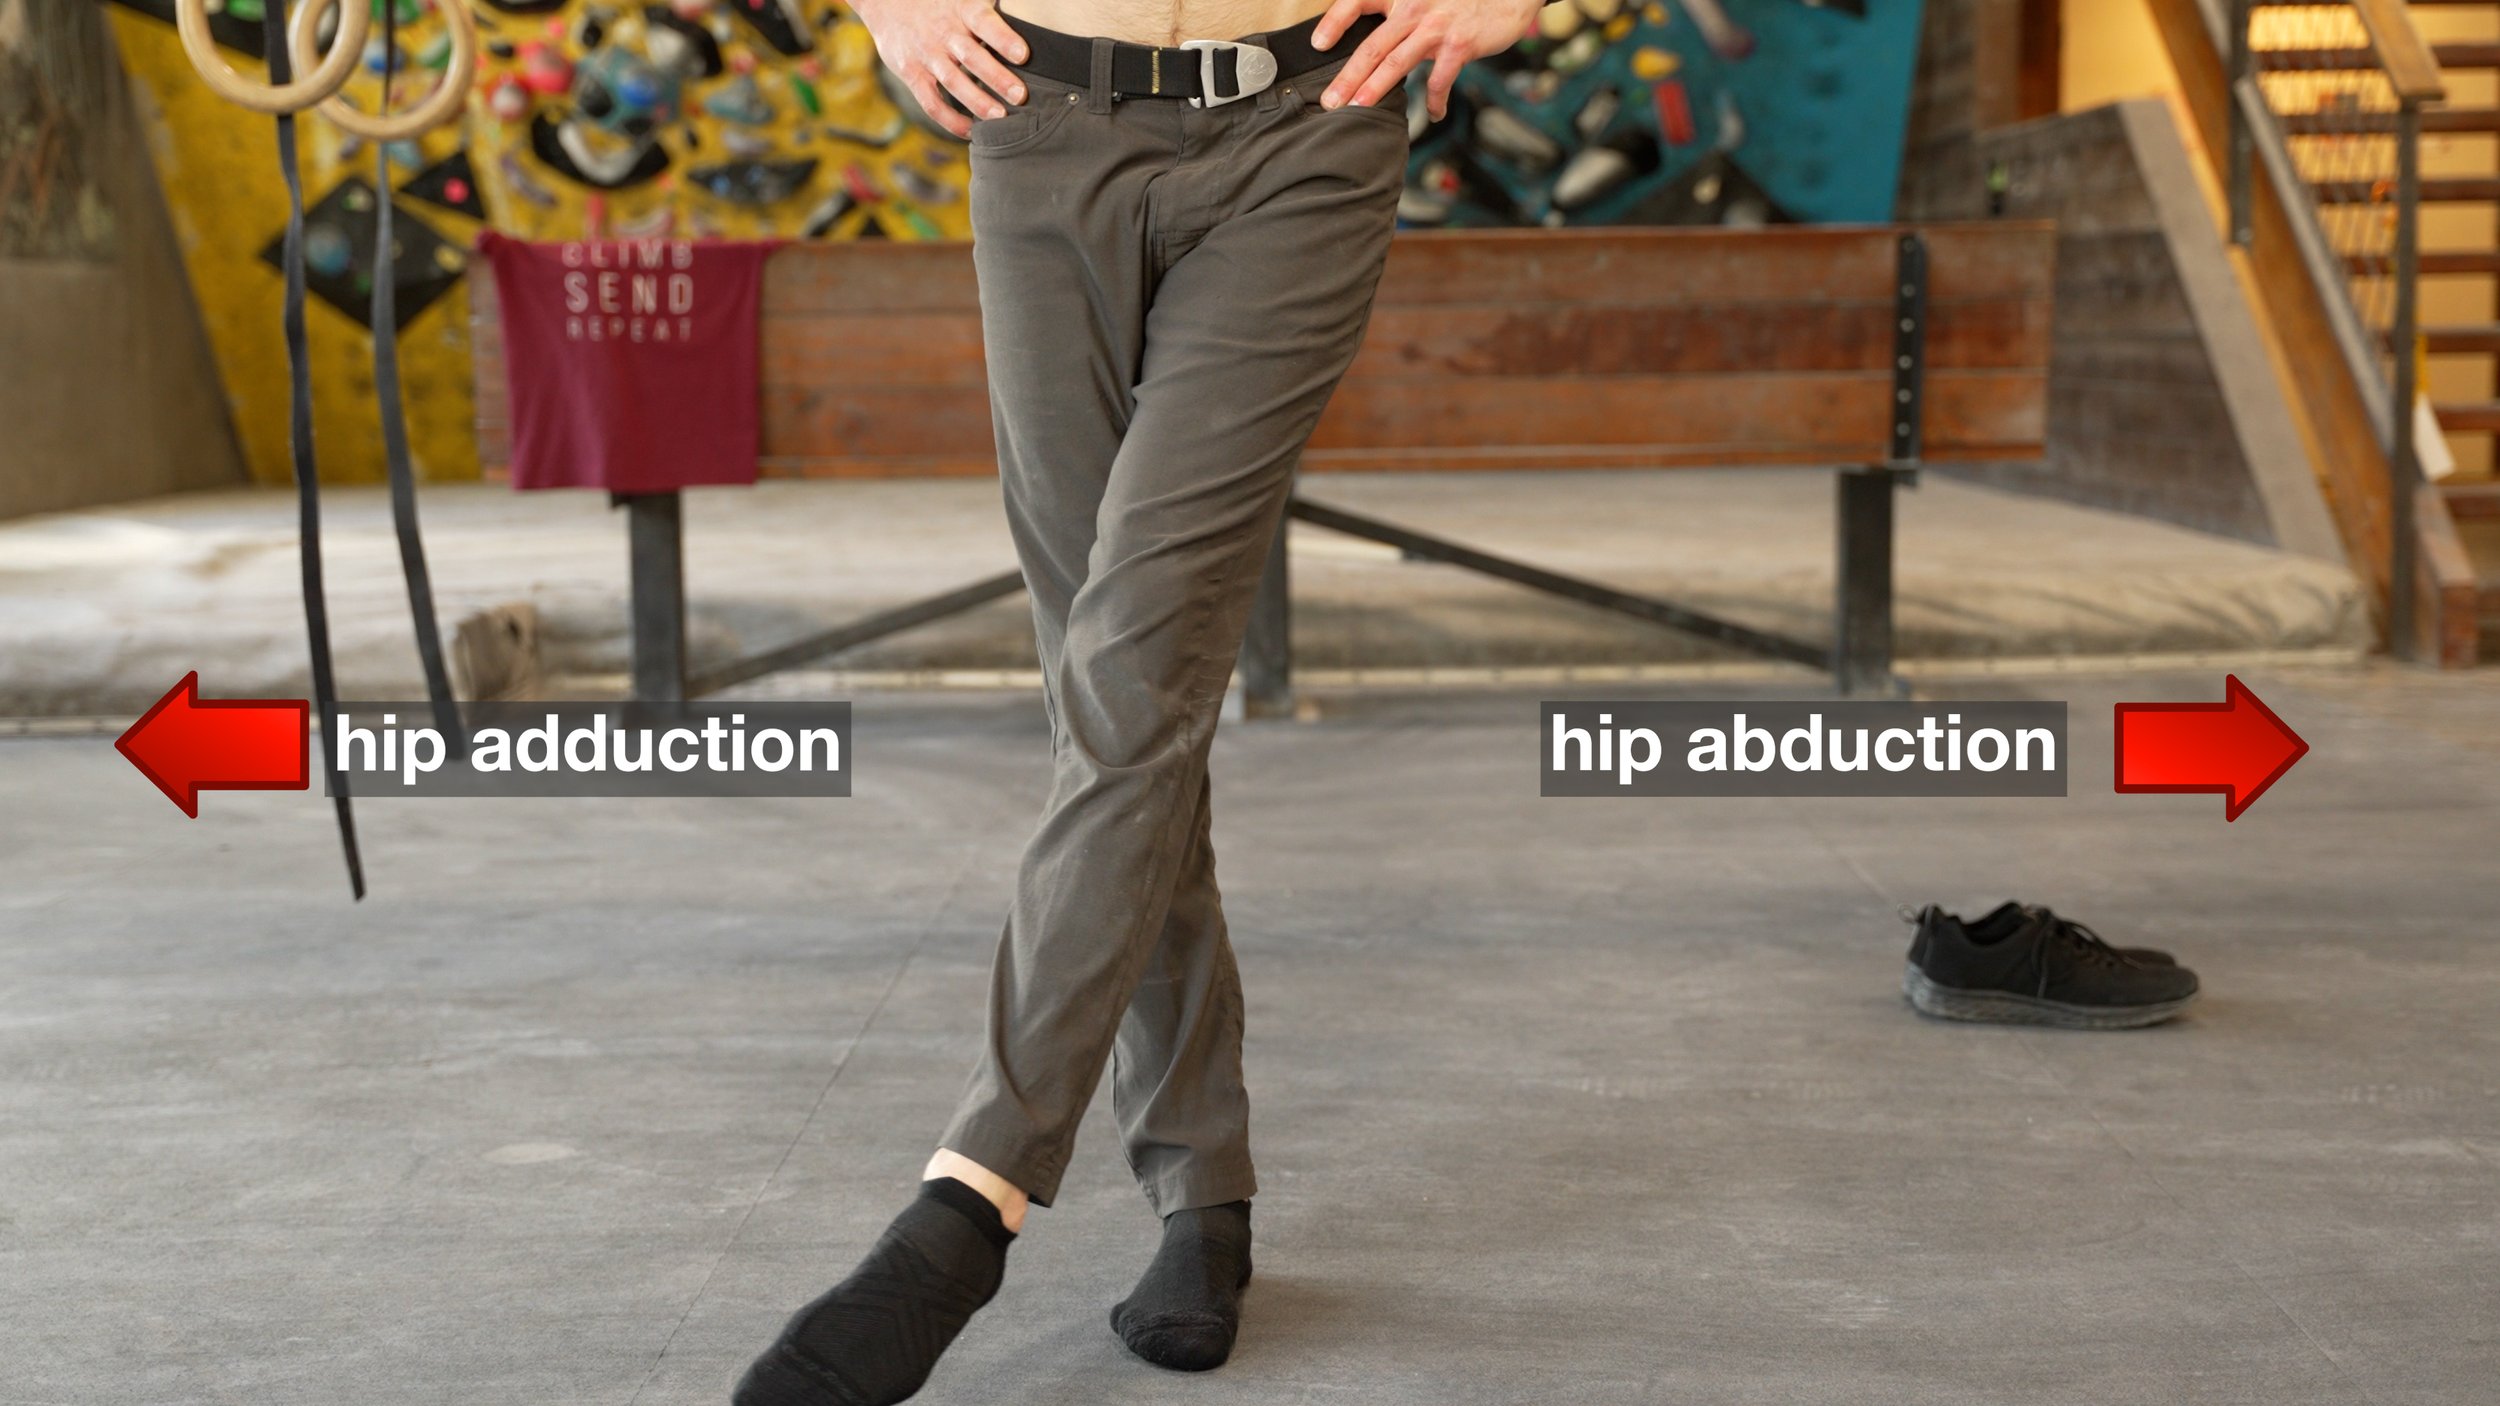
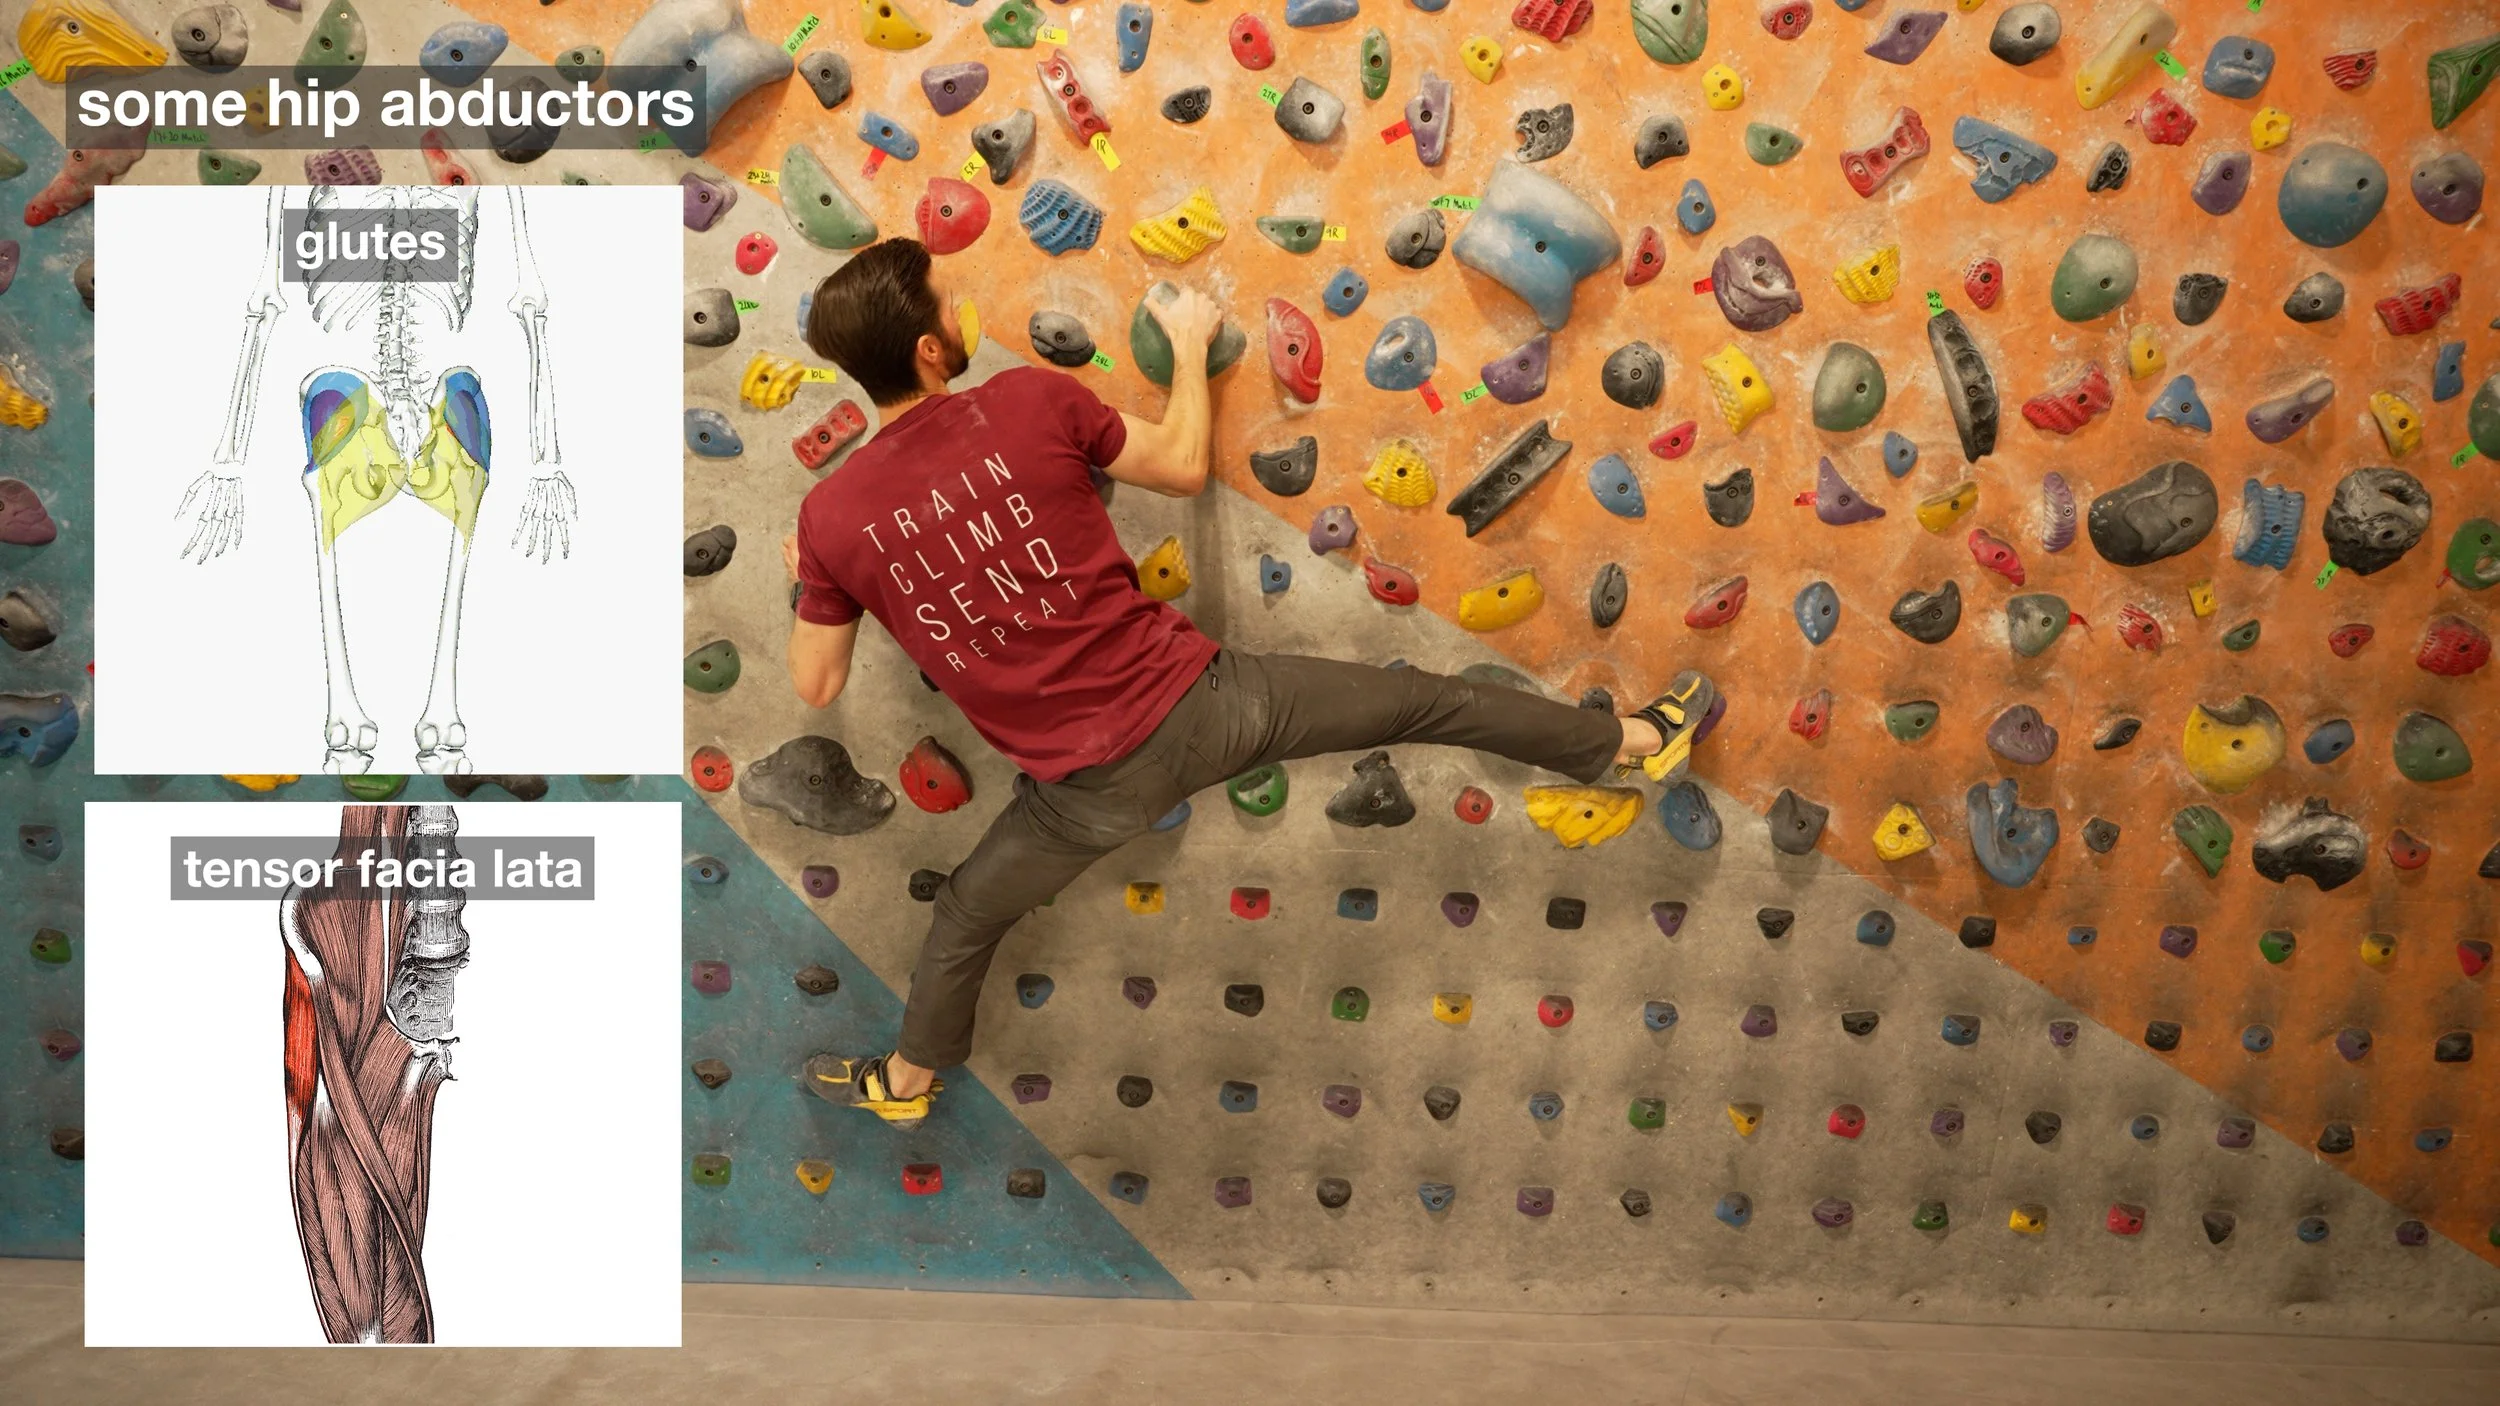
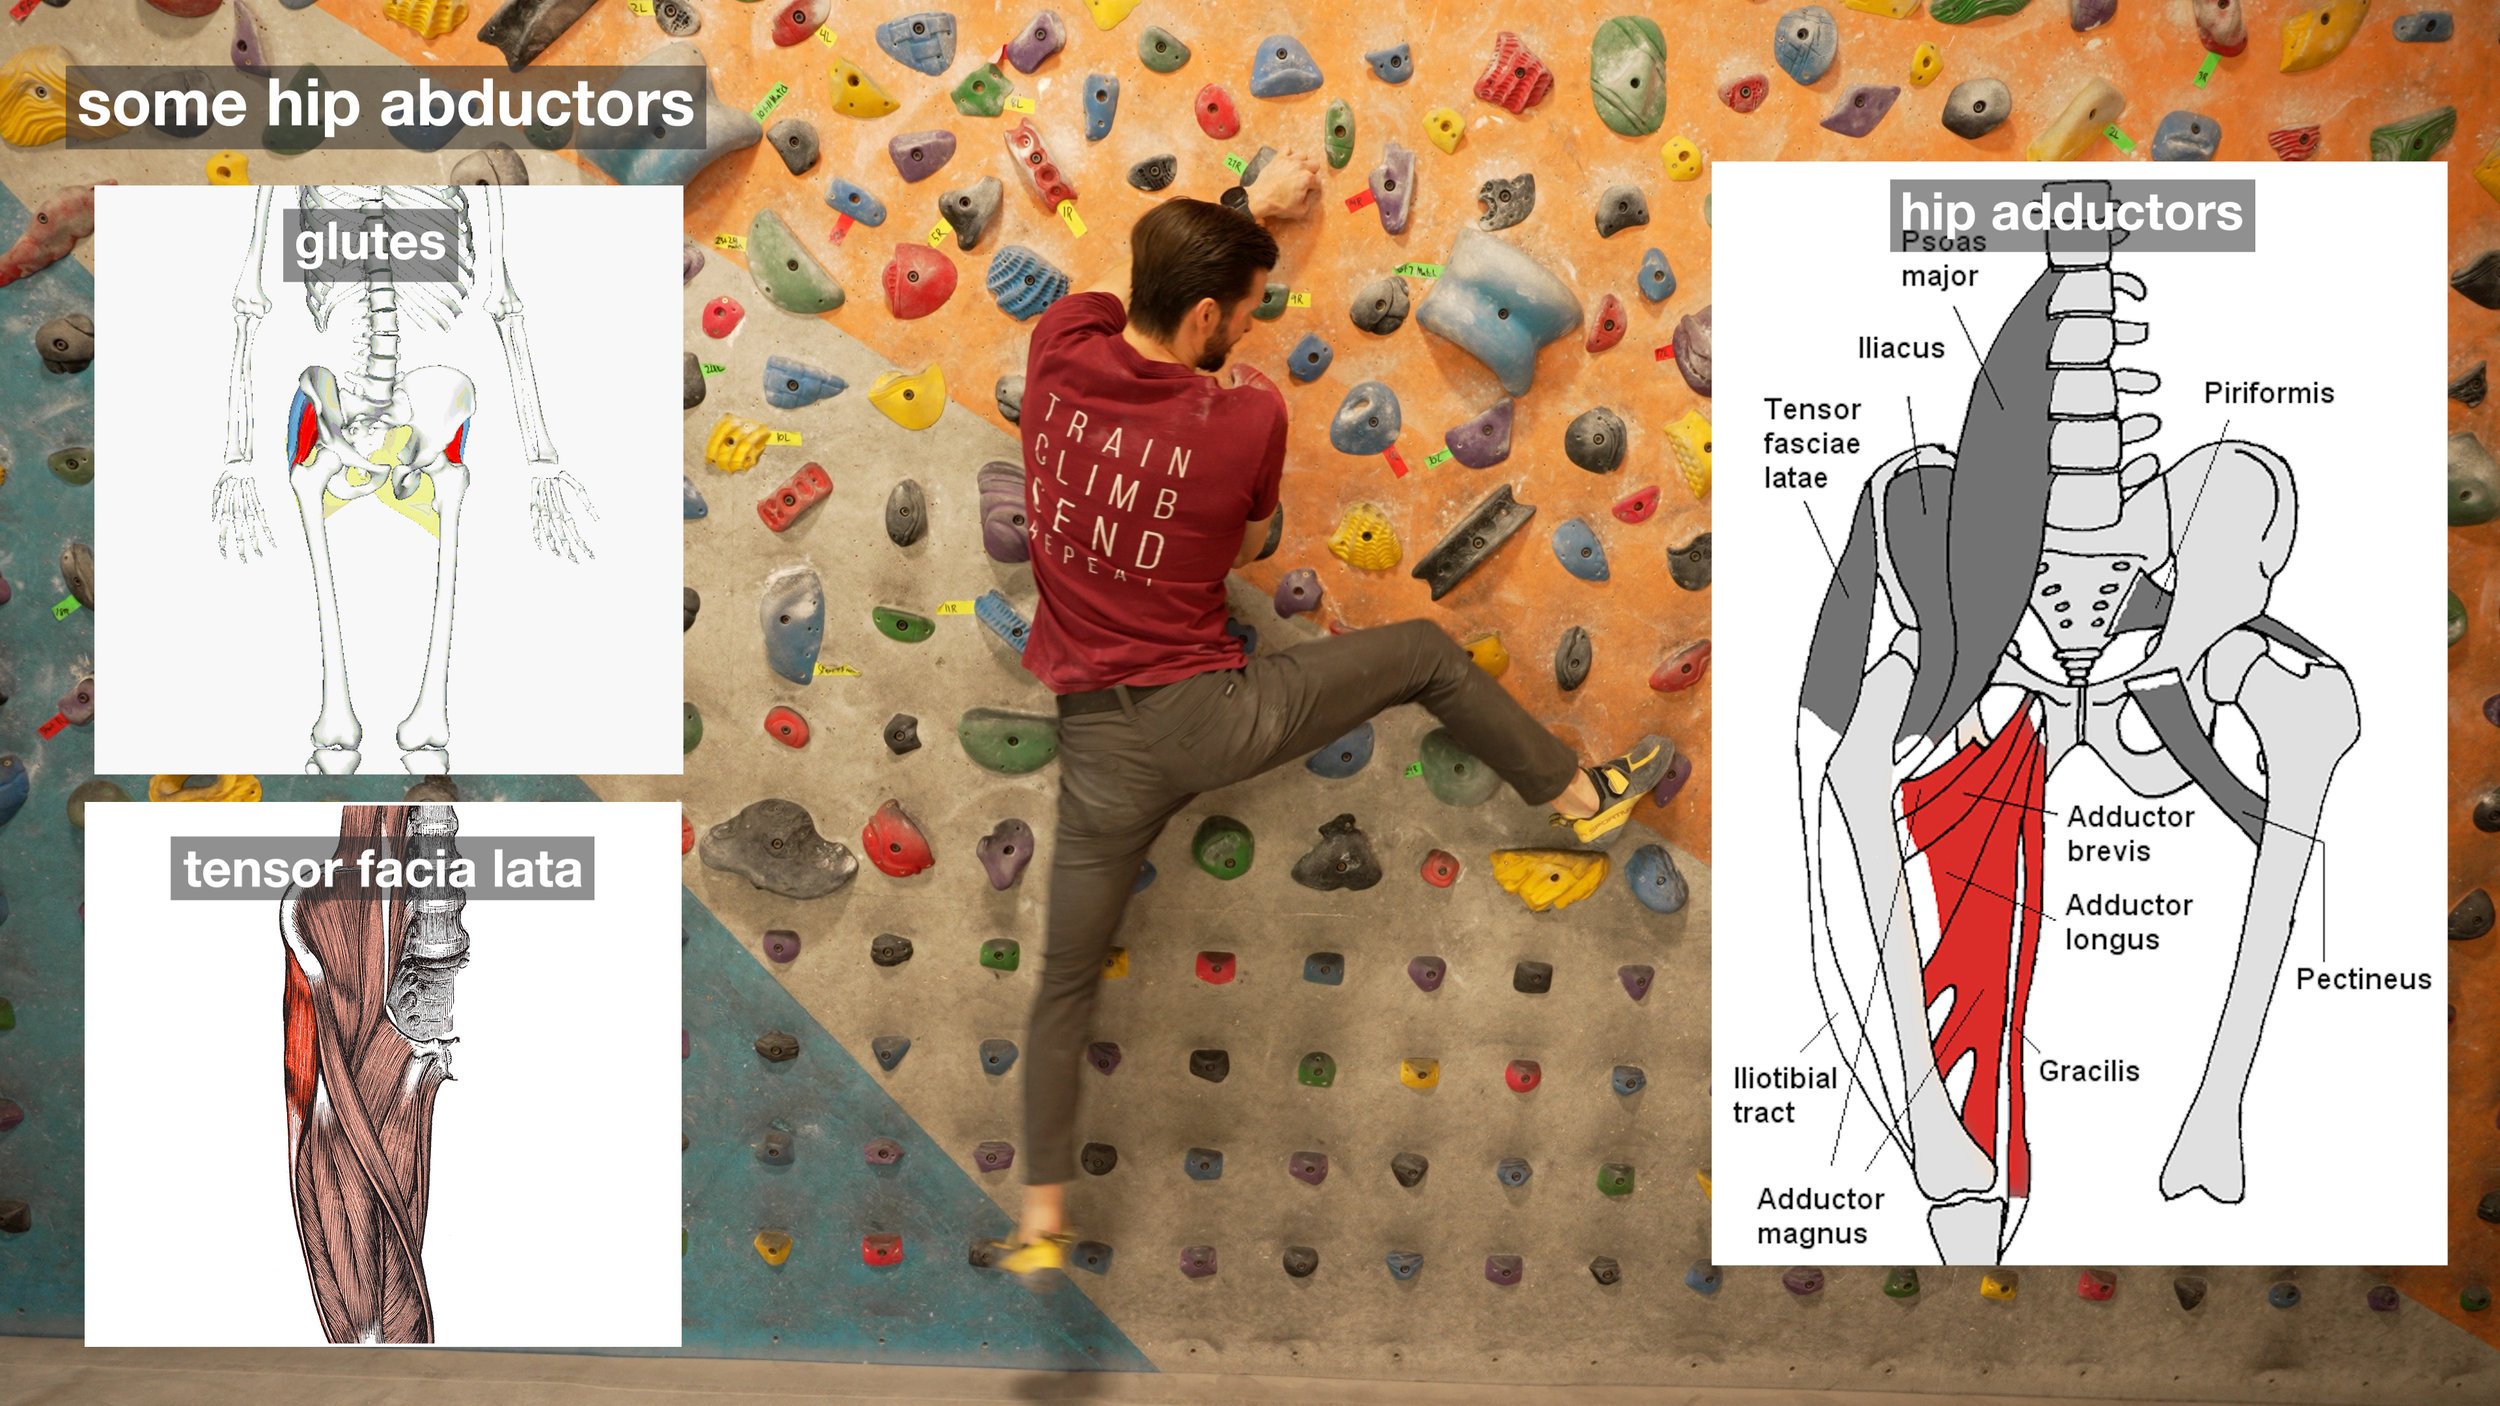


Ever reach that foot far out to the side, barely snag that foothold, and then use your leg to help pull you over and weight the foot better? How about the leg that helped push you over there to begin with? The pulling leg would be using your adductors while the pushing will utilize the leg abductors. But, there’s so much more! The hip abductors and adductors are quite important for many other actions, some of them quite niche but nonetheless useful!
For heel hooks: We know that the glutes help stabilize us during heel hooks, but did you know that the adductors of the other leg are also extremely helpful in pressing into the wall and allowing you to generate more force in the heel hooking leg? Next time you find yourself doing a sweet heel hook, try using your adductors to press the other leg into the wall and improve the compression between your legs!
For flagging: Speaking of pressing into the wall, the adductors are extremely useful in flagging and pressing the foot into the wall. The increased activation of these muscles can increase your ability to create friction with the flag foot, but can also help control your body's rotation, allowing you to move up the wall with more control.
Cross overs: Ever perform a cross over foot movement and step up onto it? Well the abductor muscles are certainly helping with that! The cross over puts the leg into more adduction, which primes the hip abductors to fire!
Pressing/dihedrals: And what about dihedrals? Both abductors and adductors are active now at varying times, whether it’s pushing out into the wall, or trying to press up while in the abducted position, these muscles are extremely useful and required to maintain friction and not fall.
Drop Knees: Finally, the adductors are quite active during a drop knee maneuver, but once again let’s not forget the potential of the off leg which may be abducting in order to create the counter force you may desire through the drop knee.
In essence, the hip abductors and adductors are extremely useful in climbing, especially when there is any lateral or side to side movement.
Fingers, Hands, Wrists


The single most important action in climbing is, of course, gripping holds! No matter what type of hold it is, our ability to grip mainly comes down to two muscles in our forearms called the flexor digitorum profundus (FDP) and the flexor digitorum superficialis (FDS), which branch off into tendons that attach up our fingers. When we grab a hold, those flexor muscles contract and tug on the tendons, which causes our fingers to flex. There are also a variety of other, smaller connective tissues in our fingers that help stabilize the joints and keep everything together under high loads, the main ones being the annular pulleys, particularly A2 and A4, and the collateral ligaments. The annular pulleys keep the tendon close to the bone, and the collateral ligaments help resist lateral forces, like when we pull hard while our forearms are not directly under our fingers, aka side pulls and far reaching holds. But, grabbing a hold is not just about our fingers! Our wrist extensors actually play a large role in stabilizing the wrist joint, which can then allow our fingers to resist higher forces! You see, because of the mobility of the wrist joint, the brain will limit the amount of force production from the finger flexors if that force poses a risk to the stability of the wrist jointLuckily, the wrist extensors help counter that force, giving the fingers the “OK” sign to produce more force as long as the wrist extensors are strong enough. Different wrist positions will change the muscle-length-tension relationship of the finger flexors, which will also affect how much force the finger flexors can handle. Too much wrist flexion and we can lose force production in the fingers, so the extensors help optimize our wrist position to facilitate optimal finger strength. Quite helpful if you ask me!
So that’s a broad overview of how we grip things, but the type of hold we grab will often dictate the position of our wrist and fingers, and that will change the biomechanics. For this section we’re going to go through each common type of grip position or hold and describe some of the differences, and then at the very end we’ll get training recommendations from Dan.
Jugs
Jug holds give us a large, comfortable surface area to wrap our fingers around with tons of leverage and friction, making them relatively easy to hold. There’s honestly not much to say about these as they don’t particularly stress any parts of our finger anatomy, other than obviously relying on our finger flexor muscles to maintain the grip position.
Sloper / Open Hand
Slopers tend to be suited for an open hand grip, with little bend at the PIP joint, requiring much more work from the flexor digitorum profundus (FDP) than the flexor digitorum superficialis (FDS) muscles to maintain pressure on the hold as well as wrist flexor and extensor strength to keep the wrist stable. People with weakness in the wrist muscles often experience discomfort on slopers. You could technically try to hold a sloper in any grip position you want, but to maximize friction an open handed grip is usually best, as it not only gives us lots of surface area to grab but also helps us keep our center of mass low.
Crimps
Crimps often put us into a more flexed position with our fingers and extended position of the wrist, which improves wrist stability, muscle-length-tension relationships, and the overall strength of the joint. So wrist discomfort is less common on crimps. The flexed finger position creates strong activation of both finger flexor muscles (FDP and FDS) and is beneficial on small holds because of increased friction between the flexor tendons and pulleys, helping us lock our fingers in place to counteract force at our fingertips. Sometimes that force can be high enough to harm the tendons and pulleys, but they will strengthen over time if you give them enough stimulus to adapt.
Drag
Because of the perceived risk of crimping or just personal preference, some people like the drag or draped position, which is more biased to the flexor muscles themselves than some of the connective tissues in our fingers. This position once again places more load on the FDP than the FDS finger flexor. Some people are actually naturally stronger in a three-finger drag than with four fingers, though all grip positions can be trained and it’s important to be well rounded. The three finger drag does pose some extra risk to these weird feathery muscles in our hands called lumbricals. Having some fingers fully flexed while others are extended creates a shear force on the rather fragile lumbricals that can lead to injuries if you’re not used to this grip position.
Pockets
The same lumbrical injury risk can be said for two finger pockets and monos, but to a greater extent. You can avoid some strain to your lumbricals by keeping your fingers more parallel to each other, but this will likely reduce the amount of force you can exert because you’re not engaging all four of the tendons connected to the flexor muscle. Luckily, not all pockets require your maximum force! Also, you can train your lumbricals to be more resistant to injury by integrating some amount of pocket training into your climbing or training routine.
Pinches
Finally, some holds allow you to use an extra digit, aka the thumb. Pinching holds can not only increase your overall grip strength, it can also increase stability of the wrist through increased activation of the multiple muscles that cross over the wrist and add stability to the joint. Contrary to popular belief, pinching is not only for large holds. The thumb can be used on many different types of holds, even small ones where you’re half crimping with the rest of your fingers! Pinch strength is an extremely versatile tool to have for many scenarios in climbing, especially for advanced moves that can benefit from using multiple grip positions in a sequence on the same hold!
Finger Extensors
Before we get to Dan’s recommendations for finger training, our eagle eyed viewers might be wondering why there was no mention of the finger extensors. You’ll hear varying opinions about their importance depending on who you ask, however, in my opinion the literature suggests that the finger extensors aren’t really that useful for finger strength. I don’t believe you need to worry about strengthening them.
Conclusion
If you’re interested in virtual or in-person coaching with Dan Beall, he offers various plans as well as one-off calls where you can get a ton of questions answered in a short amount of time with no commitment. Also, let us know down in the comments what some of your favorite exercises are for climbing and why, so that other people can see and get inspired! And remember to save or bookmark this video if you want to keep it as a reference guide.
Thanks to everyone who supports this channel -- we’ve got sweet t-shirts and affiliate links down in the description if you want to use them! Until next time: train, climb, send, repeat!
DISCLAIMER
As always, exercises are to be performed assuming your own risk and should not be done if you feel you are at risk for injury. See a medical professional if you have concerns before starting new exercises.
Written and Presented by Jason Hooper, PT, DPT, OCS, SCS, CAFS
IG: @hoopersbetaofficial
Filming and Editing by Emile Modesitt
www.emilemodesitt.com
IG: @emile166