A4 Pulley Injuries in Rock Climbers (Causes, Risks, & Recovery)
Hooper’s Beta Ep. 150
Introduction
The A4 pulley is the second most commonly injured pulley in climbers, right behind the infamous A2. It’s actually kind of shocking it’s taken us this long… but in this video we’re going to tell you everything you need to know about how A4 injuries happen, how you can identify them, how to create an awesome recovery strategy, and of course how long it’ll take until you’re back to 100%.

Sponsor

By the way, this video is sponsored by PitchSix, who make an awesome new force gauge called the Force Board. It’s quite similar to the Tindeq Progressor we all know and love, but with a few key differences. If you like making finger training routines (and even trying out other people’s routines), the Force Board app is specifically designed to accommodate that. It’s got all the functionality we’ve come to expect along with some nice surprises, like a rep logging function that starts automatically when you start pulling, RFD logging with every rep, and total load over the course of your session. It also has a temperature and humidity sensor, USB-C charging, and useful accessories! The creator of PitchSix is a Utah-based climber, engineer, and all-around nice guy, so we’re super thankful to him for helping us make free content for climbers. Get $10 off your very own Force Board with our code “hoopersbeta.” Available worldwide: https://pitchsix.com/?ref=HOOPERSBETA


What Causes an A4 Injury?

The A4 pulley is a short band of connective tissue in the middle segment of our fingers that helps keep the flexor tendon in place under load. If the load is too high, a tear can occur, anywhere from very small (grade I) to full rupture (grade III). This can even happen to a perfectly healthy pulley, like when your foot unexpectedly slips off a hold resulting in a major shockload to your finger. Naturally, though, the likelihood of injury tends to increase if there’s been any previous degradation of the tissue. This can happen over the course of a single session, like when performing a high-intensity crimp too many times in a row, but it can also happen over the course of many weeks if we consistently exceed our pulley’s ability to heal and adapt between climbing and training sessions.
With that second scenario, where the degradation builds up over multiple weeks, you may actually notice some symptoms from that alone, even if you never experienced a sudden acute overload of the pulley. We tend to call this a chronic or “overuse” injury. It’s essentially an accumulation of minor tissue damage that leads to persistent inflammation, reduced tissue integrity, and pain. In my practice I tend not to call this a “grade I pulley injury” because it’s not the same as an acute sprain, *but* the recovery protocol is essentially the same between the two. So, if your A4 injury is from overuse rather than acute trauma, you can simply treat it like a grade I.
Why Are Some Climbers More Prone to Pulley Injuries?
You might be wondering why some climbers seem to be way more prone to pulley injuries than others. There could be a ton of factors at play, but here’s one of the more interesting ones.
You know how cats have those weird spines on their tongues that make them feel super rough in one direction but smooth in another? There’s sort of a similar thing going on in our fingers, with ridges in the pulley tissue that increase friction between the pulley and flexor tendon in one direction. This helps us “lock in” to a crimp under heavy load without making it hard for the two structures to slide past each other under lighter loads. Some individuals are believed to have more of this friction than others, which could be an advantage for grip strength. However, it could make pulley tears more likely if the hand opens up under heavy load, kind of like scraping extra hard against an extra spiny cat tongue.
The amount to which this phenomenon actually contributes to pulley injuries is still being investigated, but I think it’s worth paying attention to how frequently you allow your hand to open up on hard crimps. There may be some interesting correlations there.
What Does an A4 Injury Feel Like?
Let’s identify the specific signs and symptoms of an A4 pulley injury. Keep in mind you can make this a whole lot easier on yourself by using the free finger injury self-assessment on our website, which we specifically designed to help you understand the type *and* severity of your injury. Simply answer a series of multiple choice questions and get a result! Please note this is for educational purposes only and is not a substitute for professional medical advice or diagnosis, but it’s an awesome way to jumpstart your injury knowledge. Did I mention it’s free? Go to hoopersbeta.com/finger-tool.
Grade I (Mild Sprain)
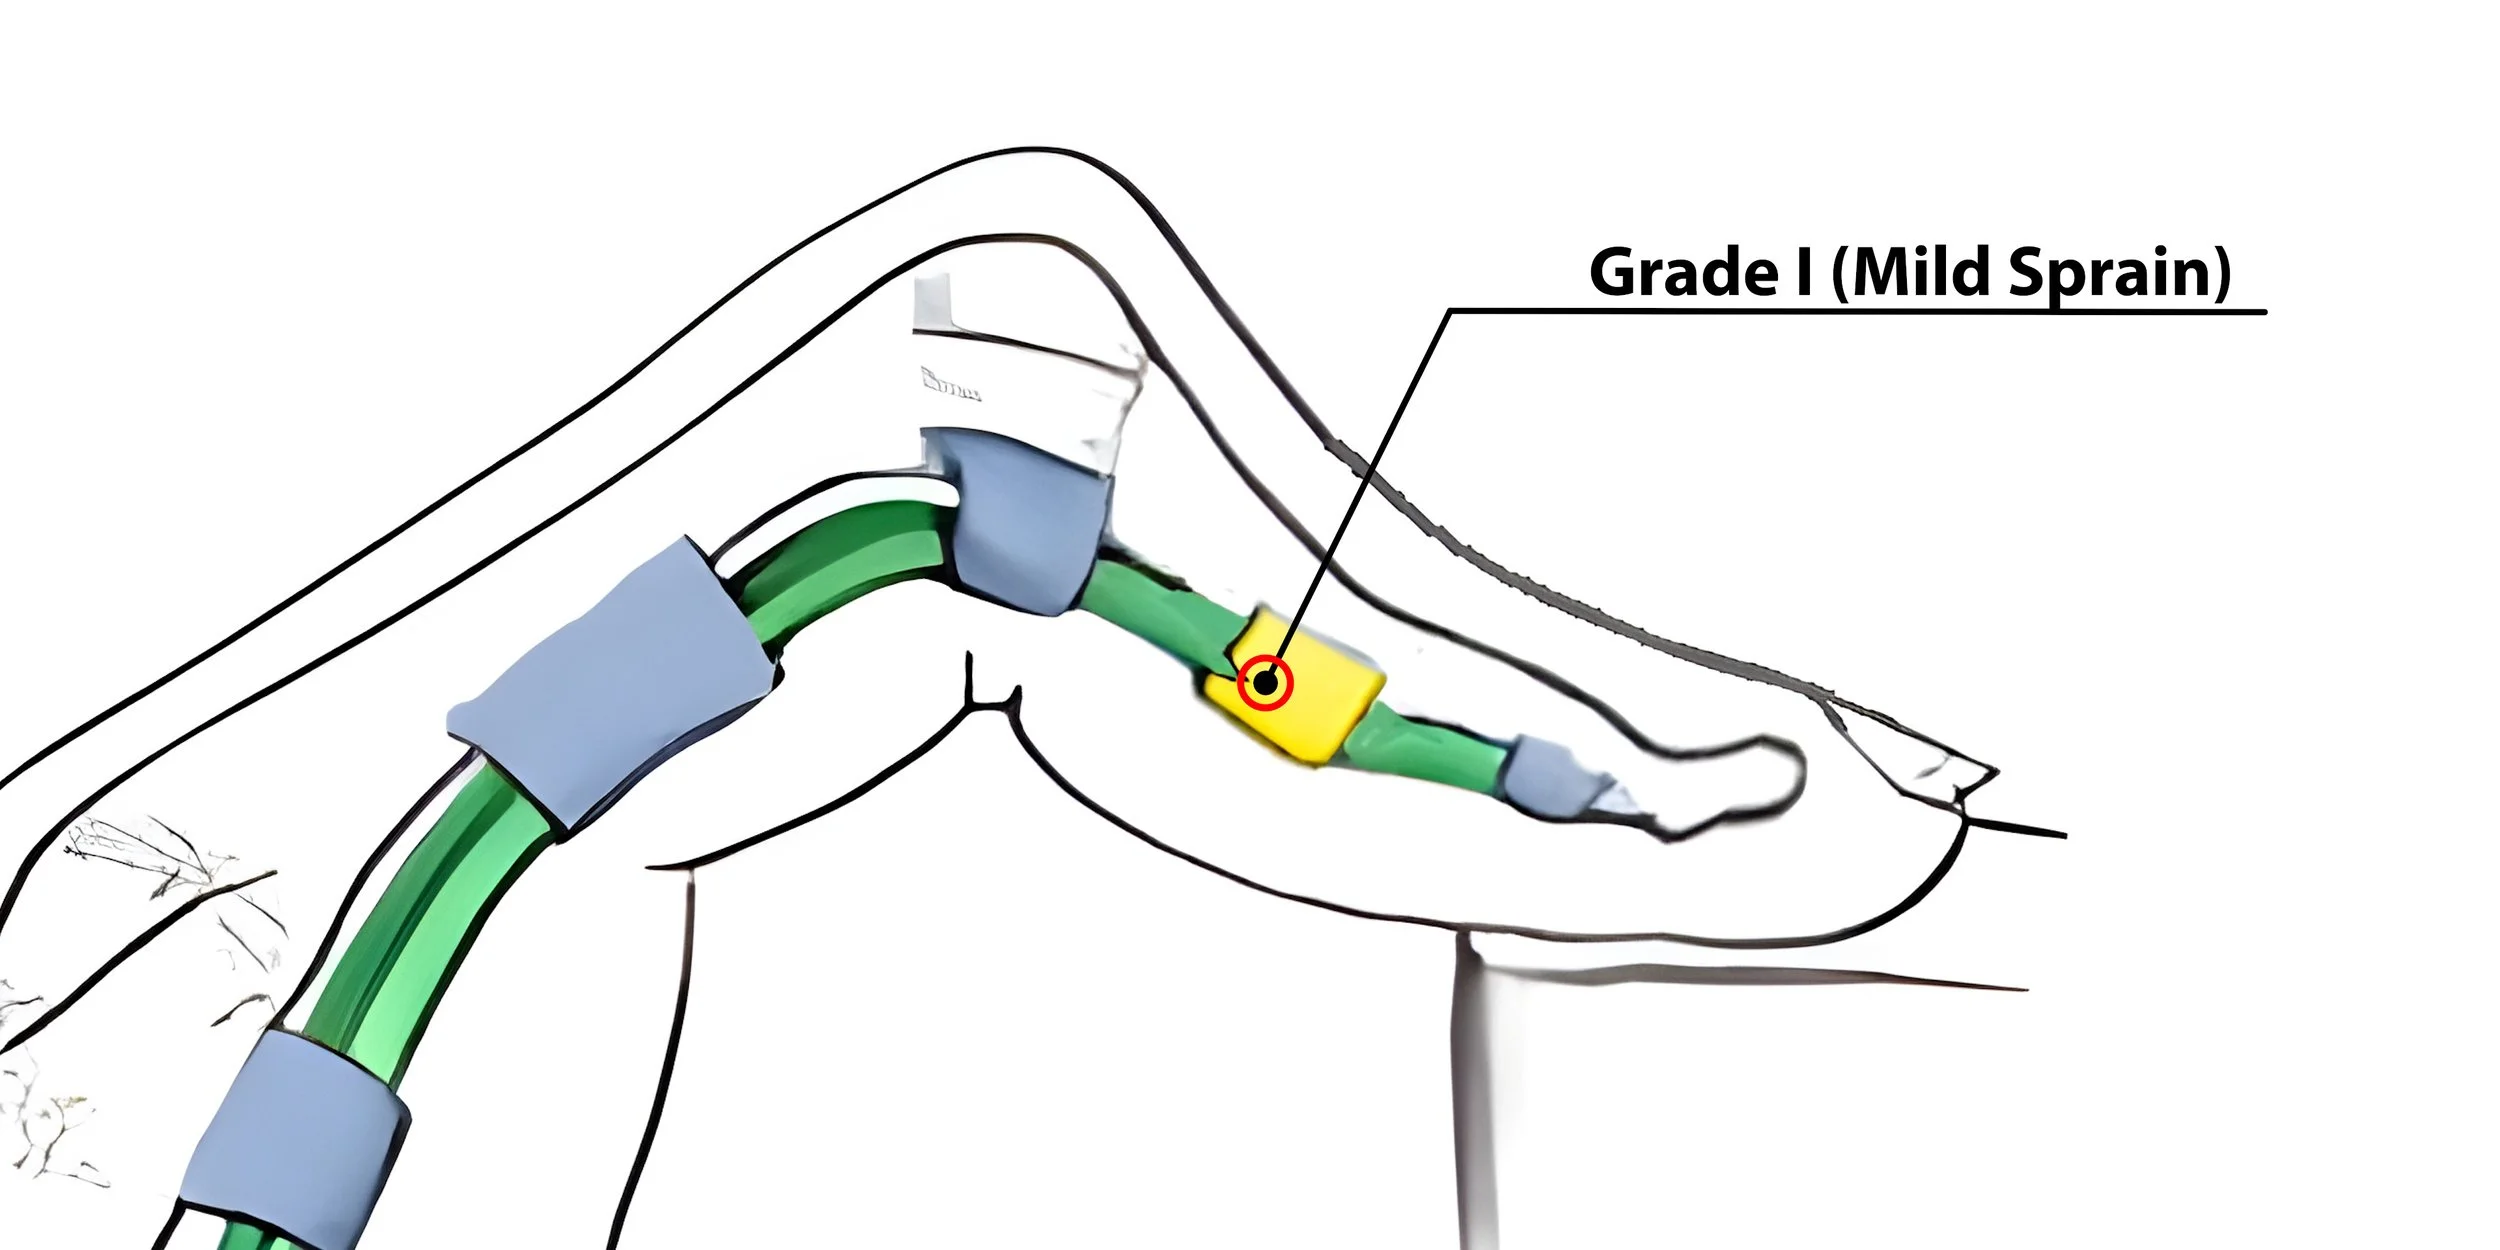
Grade I (Mild Sprain) A4 Injury
A grade I A4 injury, also known as a mild sprain, typically presents as discomfort/pain in the middle or base of the middle phalanx. This is technically a small tear of the pulley, but we call it a “sprain” to help differentiate it from more severe injuries. Grade I symptoms often appear suddenly following intense or repetitive crimping, but the pain tends to subside by the next day and there will not be any noticeable swelling. Palpating directly over the A4 region might feel mildly tender but not particularly sharp. Grip strength will be largely unaffected in open hand positions, but will be affected by more strenuous crimping.
Grade II (Partial Tear)
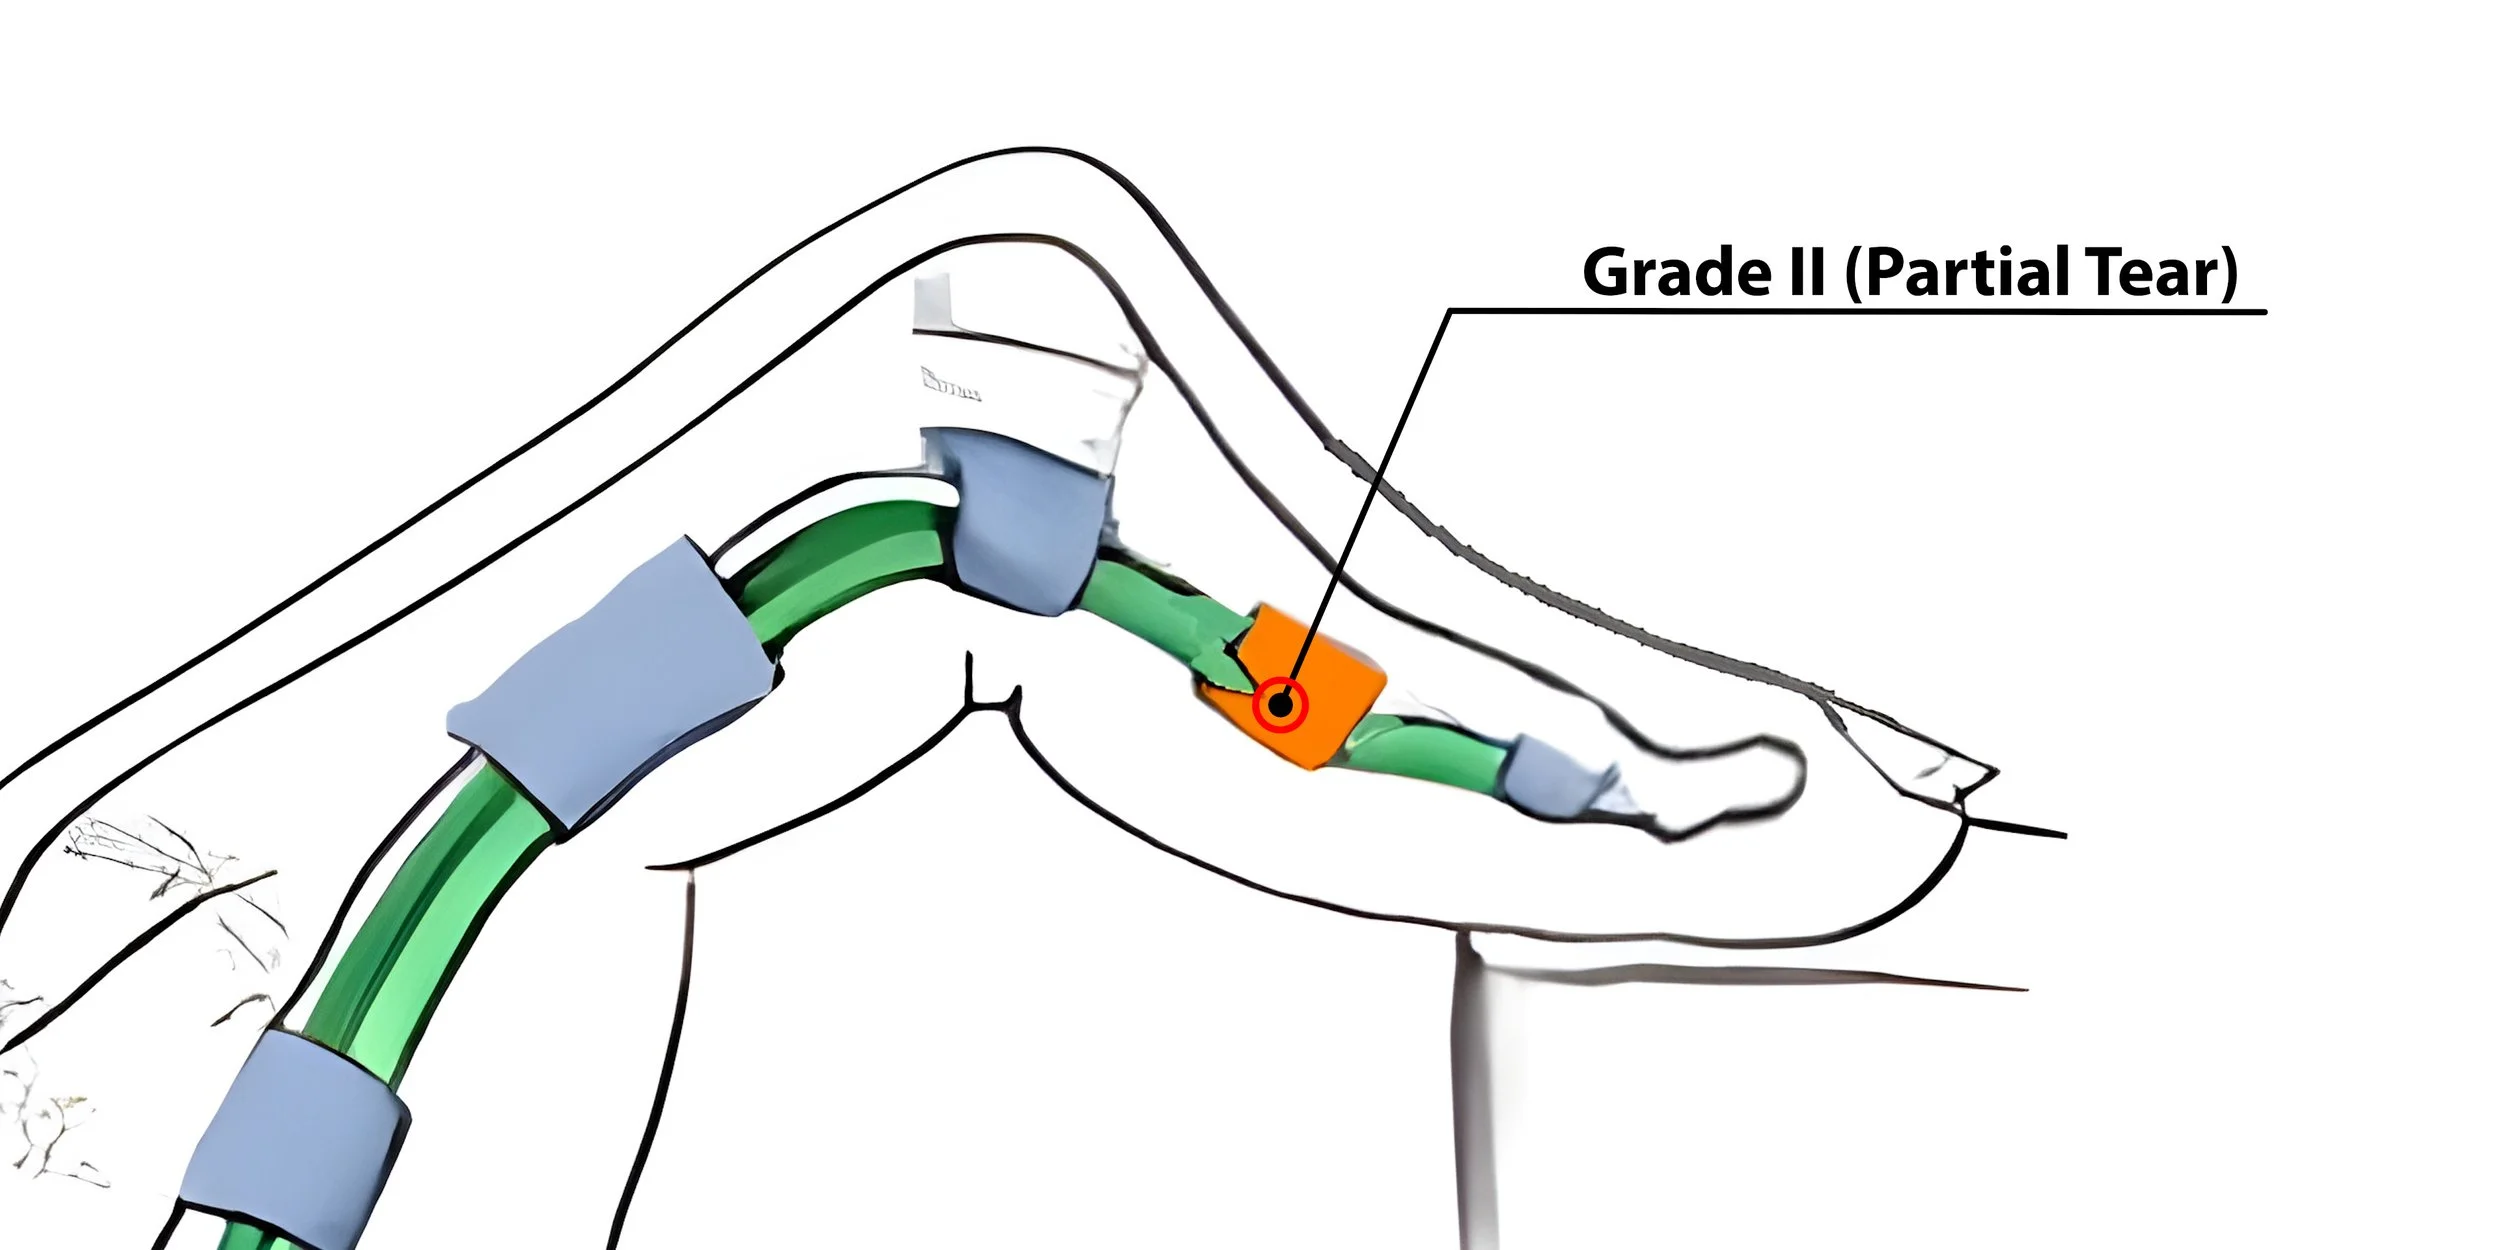
Grade II (Partial Tear) A4 Injury
With a grade II A4 injury, or partial tear, the pain is more pronounced and tends to linger beyond individual climbing sessions. Pain from palpation will be sharper and a small amount of swelling in the A4 region can develop. It’s not uncommon for the finger to feel a slight increase in stiffness when you wake up in the morning, and the finger may feel noticeably weaker or more sensitive even on larger holds. Even moderate crimping will clearly exacerbate the pain.
Grade III (Full Tear)

Grade III (Rupture) A4 Injury
A grade III A4 injury, or complete rupture, typically involves a distinct popping sound or tearing sensation at the moment of injury. Pain or discomfort can immediately follow, though it may not start until the inflammation sets in. Swelling and bruising can appear relatively quickly, though not always since the A4 is so small. Grip strength will be significantly reduced, possibly accompanied by a feeling of instability or reduced range of motion. Visually obvious bowstringing, where you can see the flexor tendon pulling away from the bone under the skin, will not occur with a single pulley rupture, but can occur if multiple pulleys are torn. If you do see *obvious* bowstringing, you should be consulting with a doctor rather than watching this video.
As you can see, the symptoms of A4 pulley injuries are pretty straightforward. However, there are a few other finger injuries that can present with similar symptoms, so you’ll want to make sure you aren’t dealing with one of those instead as that could affect your recovery needs.

A4 Injury Grade/Severity Comparison Chart
How Do I Differentiate It from Other Injuries?
You could just use our self-assessment questionnaire to make this easy on yourself, but here are the other injuries to be aware of:
Injury-induced pulley thickening (IIPT), which is a gradual build-up of disorganized, inflamed tissue that leads to noticeable thickening of the pulley under the skin.
Flexor tenosynovitis, which is chronic irritation of the sheath that surrounds the flexor tendon.
A strain or tendinopathy of the FDS tendon, which can cause similar symptoms but closer to the PIP joint or just one side of the A4 region.
A “flap tear” of the pulley, which is an unusual injury that requires medical diagnosis if you notice a catching sensation in your finger related to your A4 injury.


What’s the Prognosis?
As a climber myself, I know that pulley tears can be scary, but with appropriate recovery steps you’ll have nothing to worry about. I’ve treated so many of these, and when recovery is taken seriously, climbers not only return to full strength, they often come back stronger than before due to the structured training regimen.
The exact timeline can vary wildly depending on the quality of your recovery efforts, athletic background, genetics, etc, but for grade I injuries you can expect a return to full strength in about 6-8 weeks. For grade II injuries, think more like 8-10 weeks. And for grade III, about 10-12 weeks.
If you’ve followed a quality recovery protocol over an appropriate timeline, how do you know when you’re ready to start climbing your hardest again? If you’ve kept a log of your finger training before your injury, you can use your pre-injury metrics as goalposts. Once you can hit those numbers again without pain, you can be confident your pulley is fully healed. If you don’t have a pre-injury log to look back on, you can still get a rough idea by measuring your uninjured hand (assuming you have one of those). If the recovering hand can match the uninjured hand, you’re probably doing pretty well.
How Do I Recover?
Now to everyone’s favorite part: recovery! Of course, your exact recovery timeline and exercise protocols should be determined by your grade of injury, but we’ll do our best here to show you what you need to know. Or you could just save yourself the hassle by purchasing one of our affordable, proven Recovery Blueprints.
General recovery timeline for all grades:

General recovery timeline for all grades of A4 pulley injury. (NOTE: this is not meant to imply any exact dates or durations. Exact recovery timeline should be determined by grade of injury.)
Injury Deload & Return to Climbing
First thing’s first: for all grades of A4 pulley tears I recommend an immediate break from climbing. Climbing is unpredictable and a small miscalculation could turn a small issue into a larger one, so we might as well avoid that possibility. Also, the brief deload helps us reevaluate any overtraining habits that led us to this point.
For grade I, you’ll be off the wall for just 10 days.
For grade II: 2 weeks.
For grade III: 3 weeks.
Don’t worry; resting from climbing doesn’t mean stopping all other physical activity (including finger training, which we’ll discuss in a little bit). You’ll just need to make modifications to keep any pain from activity at or below a 2/10 and avoid aggravating your injury. For grade III injuries, you’ll have to be especially careful to avoid movements that demand excessive grip force, like deadlifts and pullups.
When you do return to climbing, start with more open handed grip positions, avoiding small holds and insecure feet. Pay attention to your symptoms before *and* after climbing and respect the usual 2/10 pain limit by modifying the volume, intensity, and frequency of your sessions.
Splinting & Taping
The traditional guidelines for splitting and taping A4 injuries are as follows:
For grade I, neither is necessary, though taping can be determined by personal preference.
For grade II, supportive H-taping is recommended during any exercise that involves gripping, including finger recovery activities, climbing, deadlifting, pullups etc.
For grade III, a pulley splint is recommended to be worn 24/7 for 3-4 weeks before weaning off it with supportive H-taping.
I recommend climbers stick to these guidelines for now if possible, but I do want to note that new research is currently being done to evaluate the necessity of splinting for grade III A4 injuries. The reasoning behind the traditional guidelines isn’t necessarily rock solid, so I’m waiting until the new research comes out to make a more concrete recommendation. For now, if for some reason you can’t or won’t wear a splint, you should simply consider supportive H-taping instead any time you’re going to do exercises involving grip.
Manual Therapy
Next up: manual therapy or massage. While research on the efficacy and mechanism of manual therapy is limited, I still recommend it because it’s essentially a zero-risk, potential-gain situation. It costs you nothing and may improve your recovery, as its proposed benefits include tissue remodeling and reorganization, which can be useful across all injury grades.
For grade I and II injuries, it could help avoid the fibrosis and excessive pulley thickening we mentioned earlier. For grade III injuries, it could help ensure the new scar tissue is well organized and strong. And yes, scar tissue is actually a good thing here.
I typically recommend daily manual therapy for 3-5 minute intervals at an intensity dictated by your current level of irritation/inflammation. The main thing you want to avoid is going too hard or too long and irritating things further, so make sure you keep the pain at or below the usual 2/10 threshold.
Range of Motion
Next up: simple range of motion work. This means fully flexing and extending your fingers in three different positions to encourage blood flow and tissue movement.
Position 1 is at the bottom of the hand (close to the wrist).
Position 2 is in the middle.
Position 3 is at the top (where you may have palm calluses).

To start, touch your fingers to position 1. Try to move your fingers in an arc rather than immediately curling them into a fist. Then, fully extend your fingers and repeat for position 2 and 3. Perform about 4-6 reps per position multiple times a day throughout your recovery.
I recommend this range of motion work for all grades, but it can be particularly useful with grade III issues to prevent tissue adhesions. We do *not* want to immobilize the finger and prevent the tissue from moving.
Note: Sometimes, with grade III issues, you may not be able to reach position 3 due to range of motion limitations. In that case, you should also work on *passive* range of motion, where you use your opposite hand to gently encourage greater range of motion than you can achieve actively (without causing more than 2/10 pain, of course).
Off-The-Wall Tissue Loading
Now, let’s talk about how and why we need to retrain the injured tissue with specific loading exercises. For grades I and II, I like to start doing this immediately. For grade III, it’s a good idea to wait a few days after the injury, but no more than that.
Loading the tissue is critical for recovery because our bodies need a stimulus to kickstart adaptation (aka healing!). The stimulus can come from just about any adequate load to our fingers, even climbing. However, climbing is not a particularly controlled environment. It’s too easy to go too hard or not hard enough, making it less than ideal to optimize our recovery. So, we should switch to a method that allows us to start at consistent low intensities and gradually ramp things up as we heal. At a certain point, the recovery exercise will actually transition into a strength training exercise, allowing you to regain, maintain, or even improve your prior level of finger strength.
Submax Holds
Our initial tissue loading activity will be low intensity, high volume submax holds. You’ll simply pull or hang on a 20-35 mm edge (depending on your grip position) with one or both hands for 30 seconds, rest for 30 seconds, and repeat
To help you gauge how hard you should be going with this exercise, use the following guidelines:
Keep the discomfort/pain at or below the usual 2/10 threshold (we don’t want to be causing significant irritation).
Keep intensity low enough that you do not feel fatigued at the start of each *rep.*
Initially, do about 8-10 reps in total, half in a drag and half in a half crimp. As familiarity and tolerance improves, increase to 12 reps. In the early stages of recovery, perform this twice a day. In later stages, you can reduce to once a day since you should be doing additional tissue loading activities at that point. You can discontinue completely once you start doing recruitment pulls or block pulls.
Mobile Board Rows
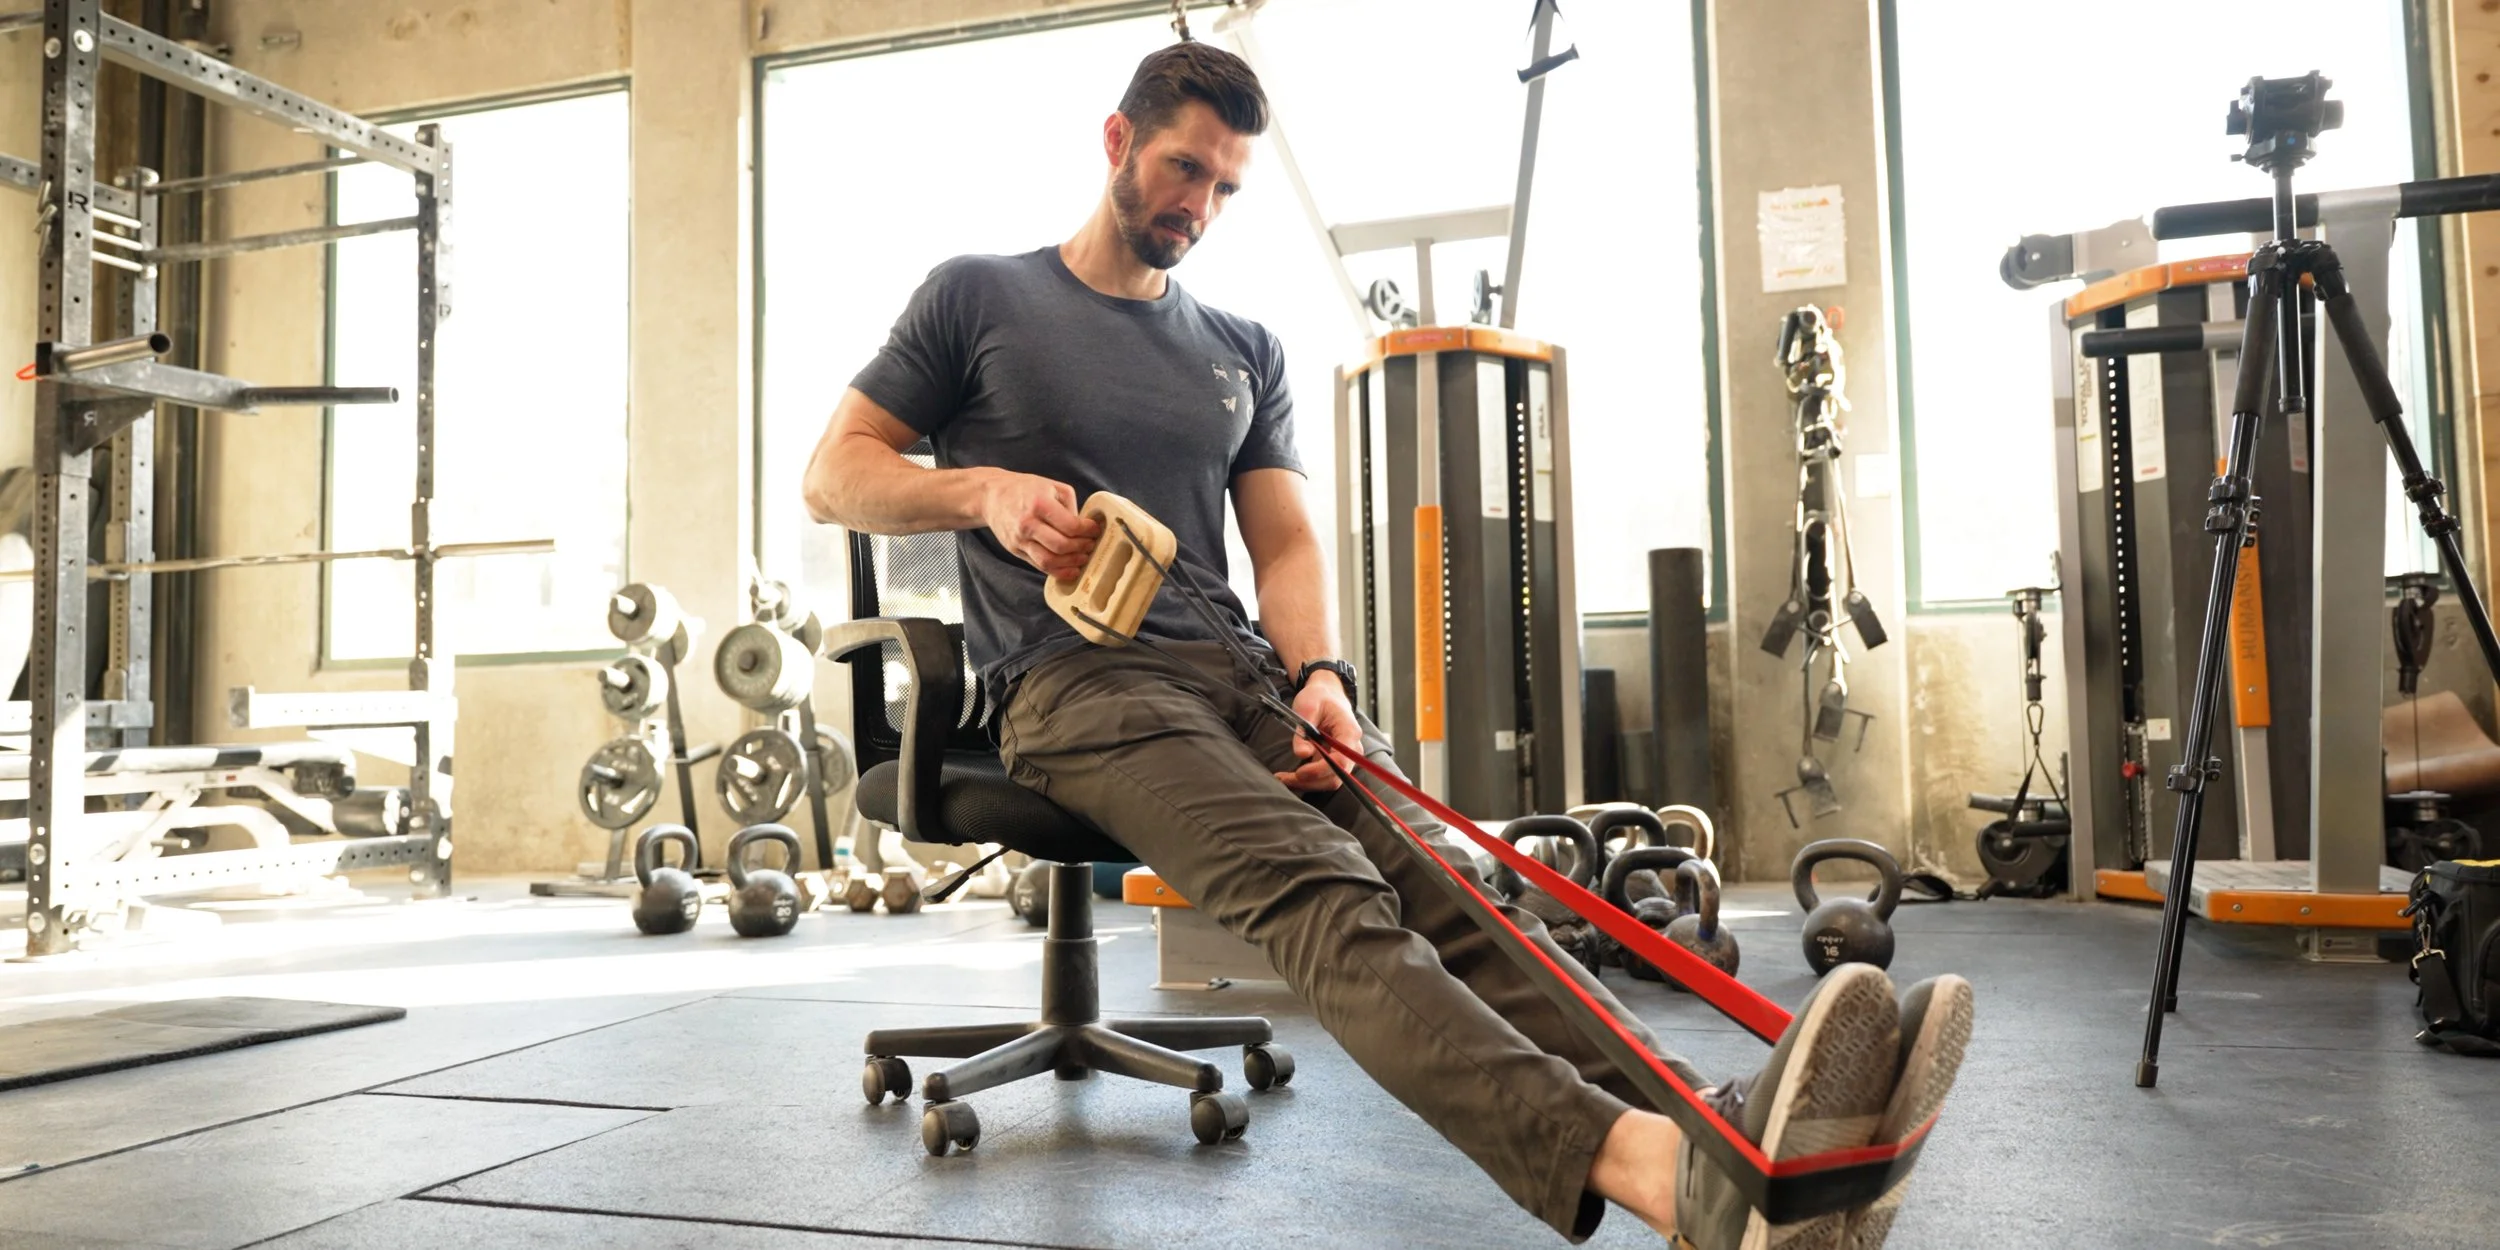
Next, we’ll want to vary our tissue loading tactics with a more dynamic variation. We’ll accomplish this by performing band-resisted rows on a comfortable edge. We can modulate the intensity with the thickness of the band, the amount we stretch it, and the speed at which we pull. A band is actually preferred over a cable system here because it starts with minimal resistance and gradually ramps up, making modulating intensity more convenient during early recovery.
To gauge how hard you should be trying, use similar guidelines: discomfort/pain at or below 2/10 and no fatigue at the start of each *set.* (Notice I said “set” there, not “rep”.)
If you have a force gauge, you can dial these in even further by seeing how hard you’re actually pulling. This is by no means necessary, but it’s another easy way to track your progress over time helps you make more informed decisions about your recovery.
I typically recommend 4-6 sets of 10-15 reps, with half the sets in a drag position and the rest in a half crimp. Perform roughly three times per week.
Recruitment Pulls


Next we’ll be progressing our tissue loading with recruitment pulls, which add a beneficial neural-recruitment factor into the mix. This is especially important when recovering from tissue tears because we quite often develop an overactive protective response to loading our injured tissue. Recruitment pulls, coupled with our other training, will help bring that response back to normal levels while also helping to safely retrain our fingers.
To perform recruitment pulls, pick a 20-25 mm edge and a half crimp position and pull as hard as you can over the course of 5-8 seconds, starting at low intensity and gradually increasing to maximum tolerable within the first few seconds. Rest for a second or two, then repeat.
This style of finger training should feel quite a bit different from the other tissue loading exercises, as all the force should come from trying to curl your fingers rather than simply stopping them from opening up. As with the previous exercises, limit your intensity so any discomfort/pain does not exceed 2/10.
I typically recommend about 4 sets of 3 reps, performed roughly three times per week.
Rapid Mobile Board Rows

Speaking of neural-recruitment factors, next we'll do a more advanced version of mobile board rows. These will be the same as before except that the pulling motion will be executed as quickly as you comfortably can. This will help retrain our nervous system and, in particular, our rate of force development (RFD) to get us more accustomed to loading the injured tissue quickly. This can be a huge hurdle for climbers returning from injury as we often become hesitant to commit to dynamic moves. Now that we’re in a later stage of recovery and our pulley is getting stronger, we can perform these rapid rows without risking re-injury.
I recommend you attempt a few pulls at a slower pace and increase the speed over a few reps so you can gauge your comfort level and resistance in the band. If you’re unable to move at a quick pace without causing discomfort/pain, then you should decrease the resistance of the band (even if it feels fine at slower speeds).
Once again, if you have a force gauge, you can measure your force or even rate of force development here, which gives you another useful metric to track over time. For example, if you measure your RFD each session and see that it’s trending up (without increases in pain), you know you’re making killer progress!
I typically recommend 4-6 sets of 8-10 reps, with half the sets in a drag position and the rest in a half crimp. Perform roughly three times per week.
Block Pulls
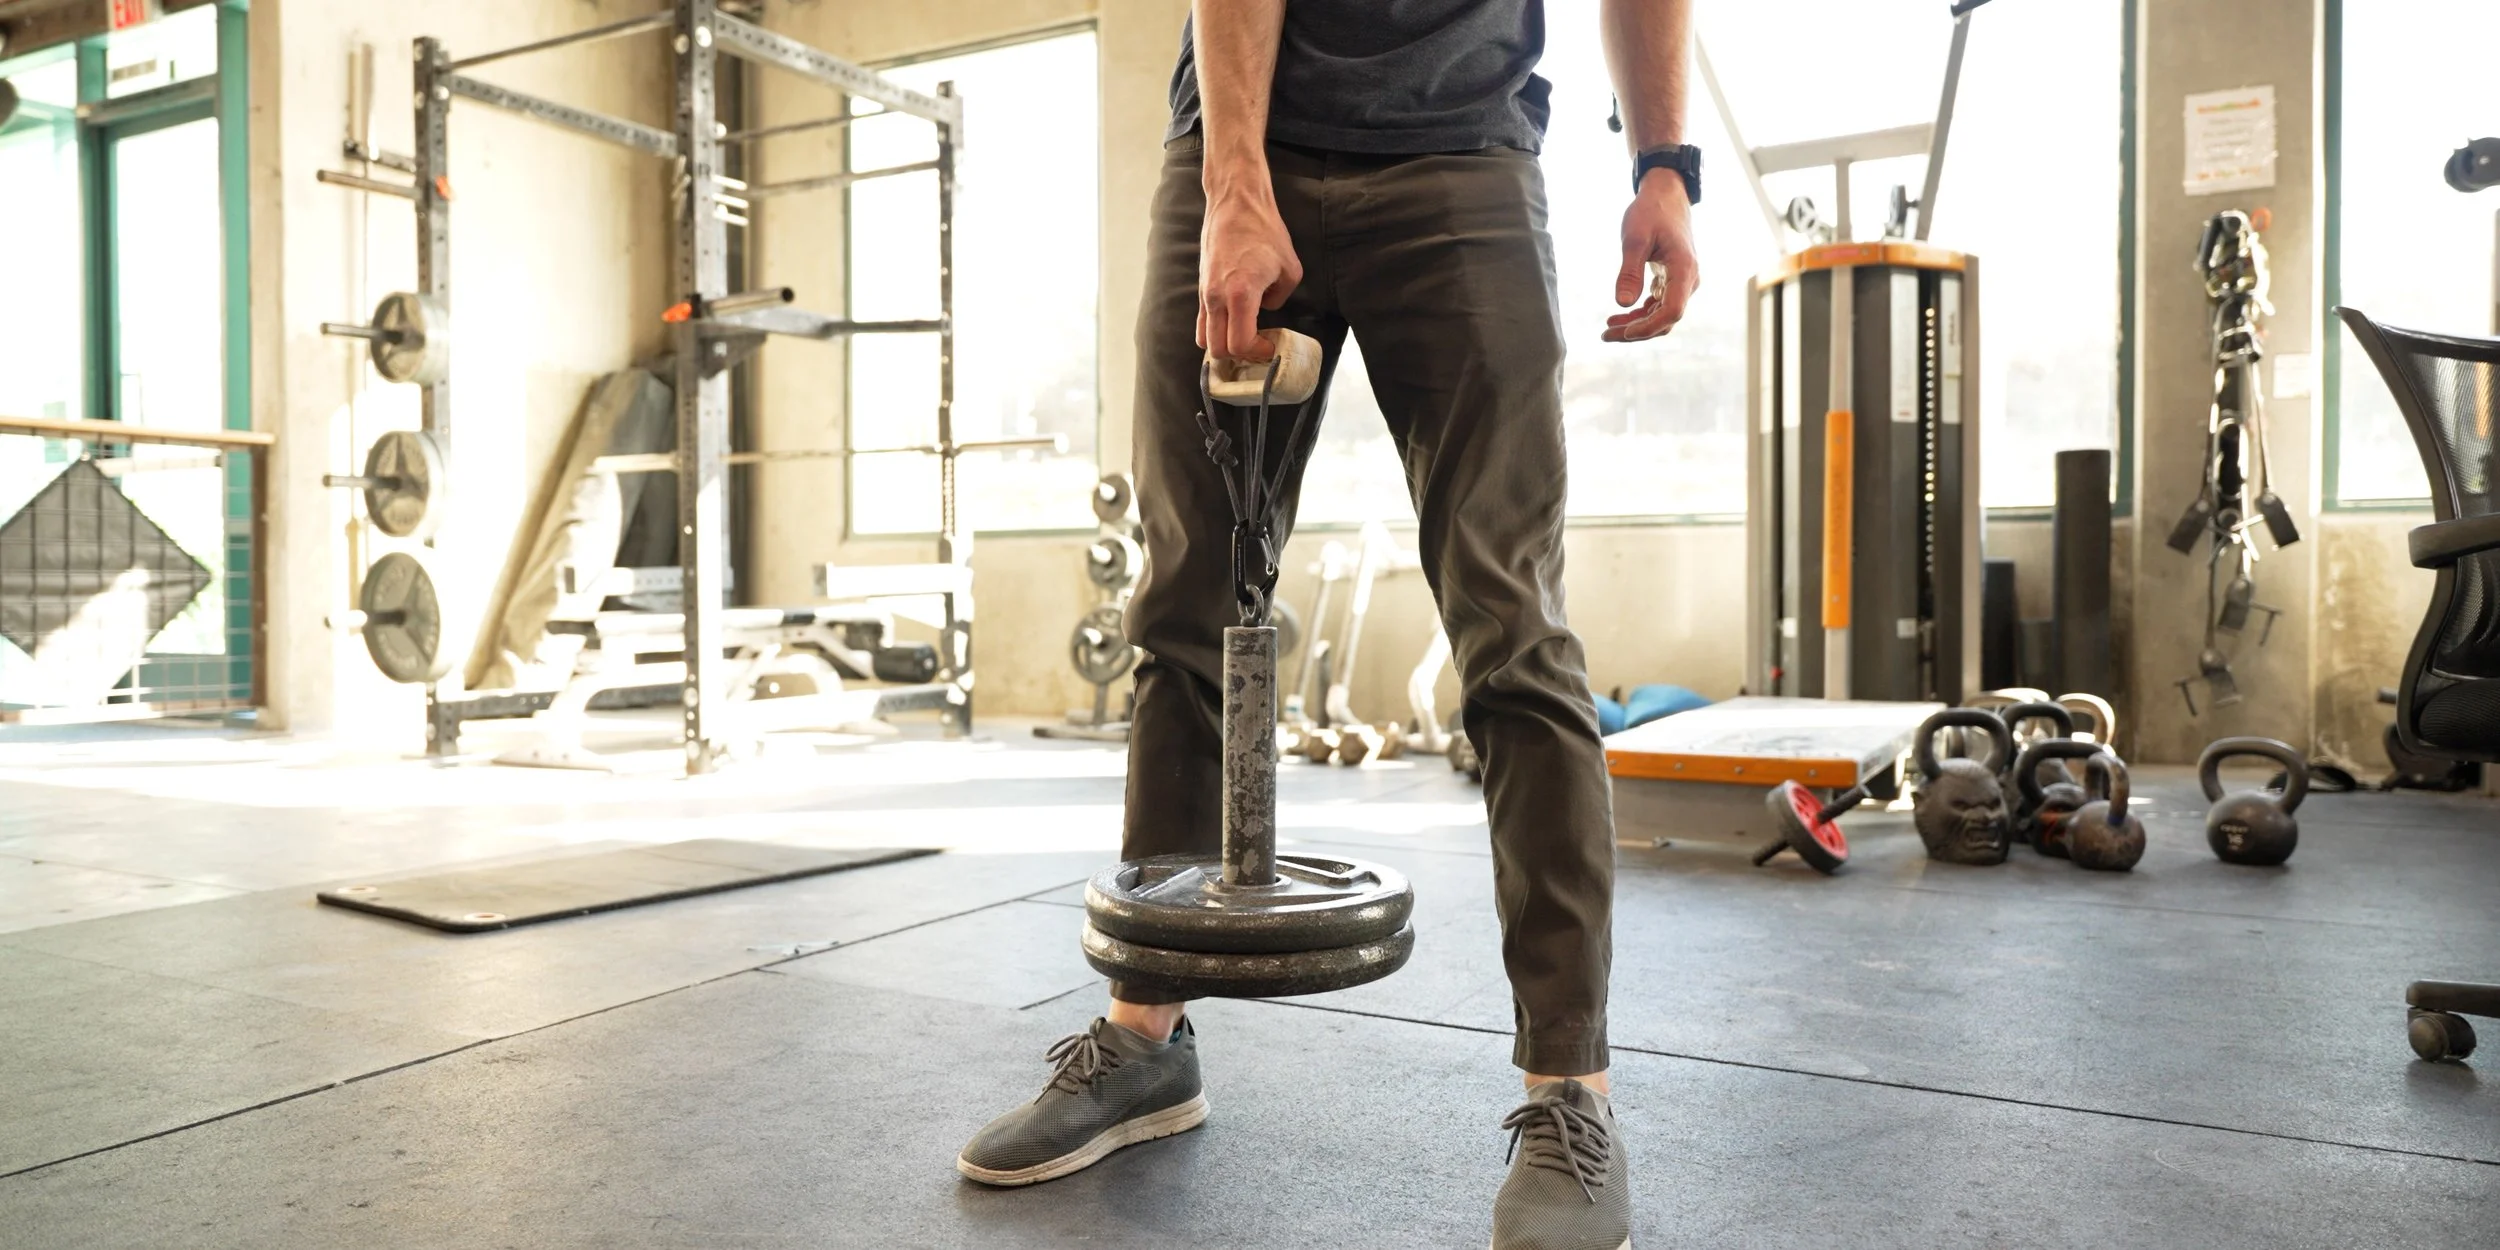
Finally, we’ll add block pulls, which are an easily measurable, progressible means of finger strengthening. Block pulls are “yielding isometric” (as opposed to the “overcoming isometric” recruitment pulls), which will help round out our finger recovery.
Block pulls require a mobile board and attachable weights or a cable machine, the most common set up being a loading pin and plates. Simply use a half crimp position to lift the weight off the ground. Do this by straightening your legs rather than pulling with your back or arm. Hold for 1-2 seconds at the top before controlling the weight back down to the ground.
To determine how much weight to use for your working sets, use the following guidelines:
Pain at or below 2/10 (nothing new there).
If you can’t maintain the half crimp for the entire duration of each rep (i.e. your fingers start opening up partway through), you need to reduce the weight.
If you can’t stick within those two parameters for all the recommended reps and sets, you need to reduce the weight.
Since this is meant to be an end-stage recovery / strengthening exercise, you should be using as much weight as you can while still sticking within these guidelines. And don’t forget to progress the difficulty by adding weight over time as your strength improves and pain reduces.
I typically recommend about 2-3 warm up sets of 6-10 reps and then 3-4 working sets of 3-5 reps. These can be performed up to three times per week, but you may need to reduce that frequency depending on how much and how hard you’re climbing at this point. We don’t want to end up “overusing” the tissue and causing disorganized healing in this end stage, so if you’re climbing three times a week you may want to reduce the block pulls to just twice a week (or vice versa).
Additional Considerations
Aside from the primary recovery activities, there are a few other things you may be curious about.
Surgery
Surgery is rarely recommended for an isolated tear of the A4 pulley, even if it’s a complete rupture. It’s usually only considered when multiple pulleys (A2, A3, and A4) have ruptured or if there’s a flap tear (which we noted earlier).
NSAIDS
Many people wonder whether they can or should take NSAIDs for a pulley injury. Unfortunately, as a physical therapist, I can’t provide specific advice on medication. If you have questions about NSAIDs, I recommend consulting with your physician or pharmacist.
Icing & Contrast Baths
Icing always gets brought up because it can mildly reduce swelling and pain, and contrast baths are said to have similar effects along with increased blood flow. However, I generally don’t recommend either of them for A4 injuries because: they rarely have swelling, the pain is not particularly intense, blood flow can be increased with simple range of motion activities, and neither intervention is all that convenient. You can certainly try them out and see what you think, but don’t let them take away from the most important aspect of your recovery: a well-designed finger loading protocol.
The Most Convenient Way to Recover
If you want to take the guesswork out of your recovery, save yourself a whole lot of time, and get a program that’s specifically designed for your grade of injury, you can get that today on our website at HoopersBeta.com/recoveryblueprint. These are the exact injury-specific programs I’ve used in my practice to help hundreds of climbers get back on the wall pain-free. They’re step-by-step, day-by-day programs guiding you from the earliest stages of healing all the way to regaining full strength and returning to peak performance. Whether you’re dealing with an A4 pulley issue or another finger injury, our Recovery Blueprints are a proven way to fast-track your rehabilitation and get you climbing hard again.
Can I Do Anything to Avoid Pulley Injuries?
It is of course impossible to avoid all injuries, but I think there are some things we should *all* do to help reduce risk.
Avoid repetitive attempts on moves that force your hand open under heavy load. This is believed to be one of the primary mechanisms of pulley injuries in climbers.
Do some form of consistent and ideally *measurable* grip training to increase work capacity and resilience, whether that’s on the wall or off it. You don’t get strong and healthy fingers by just repeating the same old climbing session over and over and hoping your fingers magically stop hurting. Safe progressions are just as key to growth as consistency.
Keep a log, even a basic one, that allows you to get a feel for your long term progress and trends. For example, if your finger strength suddenly starts trending down and you also notice some pain coming on, you now have an early sign that something is off.
Remember to take advantage of that FREE finger injury self-assessment and use our affiliate code “hoopersbeta” to get $10 off the PitchSix Force Board. Until next time: train, climb, send, repeat!
Citation
Schöffl V, Hochholzer T, Winkelmann HP, Strecker W. Pulley injuries in rock climbers. Wilderness Environ Med. 2003;14(2):94–100.
DISCLAIMER
The Beta Agency is providing content on its website that aim to inform rock climbing enthusiasts, and/or individuals interested in the field of physical therapy, of the various physical conditions that may befall those engaged in the sport of rock climbing, for informational purposes only. None of the information provided The Beta Agency should be regarded as medical advice or construed to be a medical diagnosis of any form. By using our products, services, and/or the information on our website, you acknowledge that you understand that this information is not meant to be a substitute for medical advice from an appropriate licensed healthcare professional, and that you will not rely on any of the information you acquire from us as the sole basis, personally or as a suggestion to others, to make any healthcare-related decision(s). If you suspect that you may have a medical condition that you are trying to diagnose, we strongly urge you to seek the advice of an appropriate medical practitioner. If you have a medical emergency, you should contact emergency services immediately.
Click for full Terms and Conditions and Privacy Policy
Written and Presented by Jason Hooper, PT, DPT, OCS, SCS, CAFS
IG: @hoopersbetaofficial
Filming and Editing by Emile Modesitt
www.emilemodesitt.com
IG: @emile166